

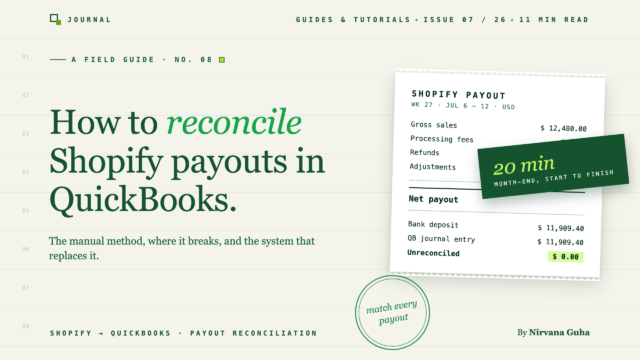
- 1מדוע רוב המדריכים ליישוב Shopify אינם עובדים
- 2כיצד ליישב תשלומים של Shopify ב-QuickBooks באופן ידני — שלב אחר שלב
- 3שלב 1: משוך את הדוח הנכון מ-Shopify
- 4שלב 2: הבן מה כל שורה אומרת
- 5שלב 3: הגדר את החשבונות ב-QuickBooks
- 6שלב 4: בנה את רישום היומן
- 7שלב 5: התאם את הפקדת הבנק
- 8שלב 6: ודא שחשבון הפיקדון מגיע לאפס
- 9היכן השיטה הידנית נכשלת
- 10מתמטיקת הנפח
- 11החזרים שחוצים תשלומים
- 12חיובים חוזרים והתאמות
- 13מעבדי תשלומים מרובים
- 14תשלומים המשתרעים על פני שתי תקופות
- 15השיטה האוטומטית: כיצד אמור להיראות יישוב
- 16ידני לעומת אוטומטי: ההשוואה
- 17כיצד נראה סוף חודש לאחר ההגדרה
כל מדריך כיצד ליישב תשלומים של Shopify ב-QuickBooks מלמד שיטה מעט שונה. זה מלמד את השיטה השלמה — וכנה לגבי בדיוק היכן היא מפסיקה לעבוד.
השעה 9:40 בערב יום חמישי ויש לך שלוש לשוניות פתוחות: דוח תשלומים של Shopify, מסך רישום יומן ב-QuickBooks, ומדריך שכותרתו משהו כמו "יישוב Shopify ב-5 שלבים פשוטים". זה המדריך השלישי שניסית ברבעון זה. הראשון אמר לך לרשום פיקדונות כהכנסה. השני אמר לך לייבא הזמנות אחת אחת. זה רוצה שתבנה גיליון אלקטרוני קודם.
כל שיטה שונה. אף אחת מהן מעולם לא השאירה אותך עם ספרים שבאמת מסתדרים — חשבון הפיקדון לעולם לא מגיע בדיוק לאפס, או שהעמלות מסתיימות בחודש הלא נכון, או שהחזר מופיע פעמיים. אז אתה מתקן את זה, מבטיח לעצמך שתבין את הדרך ה"נכונה" בחודש הבא, וסוגר את המחשב הנייד.
הנה מה שהפוסט הזה עושה אחרת. ראשית, הוא מלמד את השיטה הידנית הנכונה במלואה — הדוח המדויק, מה כל שורה אומרת, ורישום היומן המדויק, כדי שתבין מה יישוב באמת עושה. לאחר מכן הוא מראה לך היכן השיטה הזו נכשלת, באיזה נפח, ולמה. ואז הוא מראה לך כיצד התהליך נראה כאשר עבודת התרגום אוטומטית והיישוב הופך לבדיקה של 20 דקות במקום פרויקט פורנזי חודשי.
מדוע רוב המדריכים ליישוב Shopify אינם עובדים
הסיבה לכך שחיפוש כיצד ליישב תשלומים של Shopify ב-QuickBooks הוא כל כך שנוי במחלוקת היא שרוב המדריכים פותרים את הבעיה הלא נכונה. הם מתייחסים ליישוב כמשימת הזנת נתונים: להכניס את מספרי Shopify ל-QuickBooks איכשהו, ואז להתאים את הפקדת הבנק.
אבל הפיקדון מעולם לא היה הבעיה. הבעיה היא תרגום.
Shopify משלמת לך מספר נטו יחיד: מכירות ברוטו, בניכוי החזרים, בניכוי עמלות עיבוד, בתוספת או בניכוי התאמות, מקובצים יחד למשך מספר ימים של הזמנות. QuickBooks, והצהרת המס שלך, זקוקים למרכיבים הגולמיים: הכנסות, עמלות כהוצאה, החזרים כהכנסה נגדית, מס מכירה כהתחייבות. תשלום הוא קובץ דחוס. התאמה היא פעולת פריקת הדחיסה שלו בצורה נכונה. (אם אתה רוצה את האנטומיה המלאה של הסיבה שהמספרים לעולם לא מסתדרים מעצמם, פרטנו זאת בלמה תשלום Shopify שלך לעולם לא מסתדר עם מה ש-QuickBooks מציג.)
מדריכים שמדלגים על פריקת הדחיסה — "פשוט סווג את הפיקדון כמכירות" — מייצרים ספרים שממעיטים בהכנסות, מסתירים את העמלות שלך, ומציגים באופן שגוי את מס המכירות. מדריכים שמנדנדים את זה יתר על המידה — מייבאים כל הזמנה בודדת — מייצרים קובץ QuickBooks עם 40,000 עסקאות וללא דרך ברורה להתאים פיקדון מקובץ מולם.
מה שמביא אותנו לאמונה שמשאירה בעלי חנויות תקועים במדריך מספר ארבע: "חייבת להיות שיטה ידנית שעובדת, אם רק אהיה זהיר ויסודי מספיק."
זה השקר — אבל זה רק חצי שקר. יש שיטה ידנית נכונה. היא עובדת. כדאי ללמוד אותה, כי זו הדרך היחידה להבין באמת את הספרים שלך. מה שלא נכון הוא שזהירות גורמת לזה להתרחב. השיטה הבאה מדויקת בכל נפח; היא רק מעשית בנפח נמוך. נצייר את הקו הזה במדויק בחלק 2.
ראשית, השיטה.
כיצד ליישב תשלומים של Shopify ב-QuickBooks באופן ידני — שלב אחר שלב
זהו המדריך המלא להתאמת Shopify QuickBooks, ללא קיצורי דרך. נתאים תשלום אמיתי (עם מספרים פיקטיביים) מקצה לקצה.
שלב 1: משוך את הדוח הנכון מ-Shopify
בממשק הניהול של Shopify, עבור אל פיננסים → תשלומים. תראה רשימה של תשלומים עם תאריכים וסכומים נטו. לחץ על התשלום הספציפי שאתה מתאים, ואז השתמש בייצוא כדי להוריד את קובץ ה-CSV של עסקאות התשלום.
[תמונה: ממשק הניהול של Shopify, מסך פיננסים → תשלומים עם שורת תשלום אחת מודגשת וכפתור הייצוא מוקף]
זה חשוב יותר ממה שזה נשמע. אל תשתמש בדוחות המכירות הכלליים או סיכום הפיננסים למשימה זו — אלה מאורגנים לפי תאריך ההזמנה. דוח התשלומים מאורגן לפי הפקדה, והוא הדוח היחיד שסכומו הסופי שווה לפיקדון שנכנס לבנק שלך. התאמה חיה או מתה על שימוש בדוח התואם את הכסף.
שלב 2: הבן מה כל שורה אומרת
כל תשלום מסכם ארבעה סוגי עסקאות:
- חיובים — הסכומים הגולמיים שלקוחות שילמו, כולל מחיר המוצר, משלוח ומס מכירה שנאסף. זה לא ההכנסה שלך בפני עצמה; זו הכנסה בתוספת דברים שאתה חייב (מס) בתוספת דברים שחייבת (משלוח).
- החזרים — כסף שהוחזר ללקוחות במהלך חלון התשלום הזה, ללא קשר מתי ההזמנה המקורית התרחשה. זכור את הסעיף הזה. זה יגרום לצרות בהמשך.
- עמלות — עמלות העיבוד של Shopify Payments (האחוז לכל עסקה בתוספת הסכום הקבוע).
- התאמות — חיובים חוזרים, עמלות חיוב חוזר, עתודות ותיקונים.
חיובים - החזרים - עמלות ± התאמות = הפיקדון נטו. שורת התשלום שלנו:
| שורת תשלום | סכום |
|---|---|
| חיובים (ברוטו) | $4,600.00 |
| החזרים | −180.00$ |
| עמלות | −148.14$ |
| התאמות | $0.00 |
| תשלום נטו (הפקדה בנקאית) | $4,271.86 |
מתוך 4,600$ אלו של חיובים, הייצוא מפרט: מכירות מוצר 4,120.00$, דמי משלוח שנאספו 230.00$, מס מכירה שנאסף 250.00$.
שלב 3: הגדר את החשבונות ב-QuickBooks
אתה צריך שש חשבונות. לרוב קבצי QuickBooks כבר יש ארבעה מהם:
- הבהרת תשלומים של Shopify — צור את זה. סוג: בנק (או נכס שוטף אחר). זהו כלי קיבול המייצג כסף ש-Shopify אספה עבורך אך עדיין לא הפקידה. חשבון זה הוא כל הטריק: הוא מה שמאפשר לפעילות ברוטו ולהפקדות נטו להתקיים מבלי להילחם.
- מכירות — Shopify (הכנסה)
- הכנסות משלוח (הכנסה)
- מס מכירה לתשלום (התחייבות שוטפת אחרת)
- החזרים והנחות (הכנסה, קונטרה — או חשבון הנחות/החזרות)
- עמלות סוחר — Shopify (הוצאה)
[תמונה: תרשים חשבונות של QuickBooks המציג את ששת החשבונות, עם חשבון הבהרת תשלומים של Shopify החדש מודגש]
שלב 4: בנה את רישום היומן
זהו לב השיטה — פקודת יומן Shopify תשלום QuickBooks שרוב המדריכים מתעלמים ממנה. ב-QuickBooks: + חדש → פקודת יומן, מתוארכת לתאריך התשלום. ואז:
| חשבון | חובה | זכות |
|---|---|---|
| הבהרת תשלומים של Shopify | $4,271.86 | |
| עמלות סוחר — Shopify | $148.14 | |
| החזרות והנחות | $180.00 | |
| מכירות — Shopify | $4,120.00 | |
| הכנסות משלוח | $230.00 | |
| מס מכירה לתשלום | $250.00 | |
| סכומים כוללים | $4,600.00 | $4,600.00 |
קרא מה הפעולה הזו עושה, כי היא באמת אלגנטית: ההכנסה נרשמת בברוטו (4,120$ + 230$), המס שאספת נשמר כהתחייבות במקום לנפח את ההכנסה, העמלות מופיעות כהוצאה אמיתית שניתן לראות ולנכות, החזרים מפחיתים הכנסה מבלי למחוק את המכירה המקורית — וחשבון הפינוי תופס את הסכום נטו, שזה בדיוק מה שעומד להגיע לבנק.
חיובים חייבים להשוות לזיכויים. אם הם לא, קראת שורה בייצוא בצורה שגויה — בדרך כלל החזר או התאמה. אל תכריח את זה להתאזן עם שורת עיגול; מצא את החסר.
[תמונה: פקודת יומן QuickBooks שהושלמה התואמת את הטבלה שלמעלה, עם שורת סכומים מאוזנים גלויה]
שלב 5: התאם את הפקדת הבנק
פתח את הזנת הבנק שלך. יש הפקדה — משהו כמו "SHOPIFY *PAYOUT" בסך 4,271.86$. רשום אותה כהעברה מ-Shopify Payments Clearing לחשבון העובר ושב שלך (או השתמש ב-Match אם QuickBooks מזווג אותה אוטומטית).
לא הכנסה. לעולם לא הכנסה. ההכנסה כבר נרשמה — ברוטו, כראוי — בשלב 4. ההפקדה היא רק הכסף שזז פיזית.
שלב 6: ודא שחשבון הפיקדון מגיע לאפס
פתח את רישום הבהרת תשלומים של Shopify. לאחר שלב 4 (4,271.86$ פנימה) ושלב 5 (4,271.86$ החוצה), היתרה עבור תשלום זה אמורה להיות אפס בדיוק. האפס הזה הוא כל המטרה: זו הוכחה שמה ש-Shopify אמרה ששלחה, מה שרשמת, ומה שהבנק קיבל הם אותו מספר.
אם חשבון הפינוי נושא יתרה מקרית, משהו במעלה הזרם שגוי — וחשבון זה הוא המקום שבו הוא צף. זו תכונה. חשבון פינוי שלעולם לא מתאפס הוא מערכת ההתראה המוקדמת שלך.
זוהי השיטה השלמה עבור תשלום אחד. מבנה זה זהה מהווה גם את הבסיס לרישום נכון של מכירות יומיות — החלק המשלים, כיצד לרשום מכירות Shopify ב-QuickBooks Online, מכסה את הצד הזה של החשבונאות.
ועכשיו לחלק הכנה.
היכן השיטה הידנית נכשלת
השיטה הנ"ל נכונה. כאן בדיוק "נכון" ו"ישים" נפרדים.
מתמטיקת הנפח
Shopify Payments משלמת בלוח זמנים מתגלגל — עבור רוב החנויות בארה"ב, זה אומר תשלום כמעט בכל יום עסקים. נקרא לזה 21 בחודש. אם כל אחד מהם לוקח 10–15 דקות כששום דבר לא מוזר (ייצוא, קריאה, בניית הרשומה בת שש שורות, התאמה, אימות), זה 4–5 שעות בחודש כשכל דבר הולך בצורה מושלמת. זה כמעט אף פעם לא הולך בצורה מושלמת. ב-500+ הזמנות בחודש, זמן התאמה בעולם האמיתי מתקרב ל-6–8 שעות ברגע שסופרים חקירה.
החזרים שחוצים תשלומים
זכור את הסעיף משלב 2: החזרים מופיעים בחלון התשלום כאשר הם מונפקים, לא כאשר ההזמנה המקורית שולמה. אז לקוח קונה בתשלום #113 ומחזיר בתשלום #121. תשלום #121 מכיל כעת שורה שלילית ללא מכירה תואמת באותו אצווה. החזרים חלקיים גרועים יותר — החזר של 37.50$ כנגד הזמנה של 95$, כאשר Shopify מחזירה את עמלת האחוז שלה אך לא את החלק הקבוע. כל אחד מהם הוא פרויקט מחקר קטן.
חיובים חוזרים והתאמות
חיוב חוזר מושך את הסכום השנוי במחלוקת בתוספת עמלת מחלוקת (בדרך כלל 15$) מתשלום, חודשים לאחר המכירה. אם תזכה במחלוקת, הכסף חוזר בתשלום נוסף. אלו שלוש רשומות על פני שלוש תקופות עבור עסקה אחת — ואף אחת מהן אינה מתויגת באופן ש-QuickBooks מבין.
המכניקה המלאה — מחזור החיים של המחלוקת, עתודות, והרשומות עבור שתי התוצאות — נמצאות ב מדריך חשבונאות לחיובים חוזרים שלנו.
מעבדי תשלומים מרובים
דוח התשלומים מכסה רק Shopify Payments. אם לקוחות משלמים גם דרך PayPal, Klarna, או Amazon Pay, כל מעבד מבצע אצווה בלוח הזמנים שלו, מפקיד בנפרד, וגובה עמלות שונות. כעת אתה מריץ את כל שיטת ששת השלבים הזו שלוש או ארבע פעמים במקביל, עם חשבון מעבר לכל אחד.
תשלומים המשתרעים על פני שתי תקופות
תשלום שהופקד ב-1 באוגוסט מכיל הזמנות מ-28–30 ביולי. רישום כל הרשומה בתאריך ההפקדה וההכנסות של יולי מוצגות בחסר, אוגוסט מוצגות ביתר. עבור חנויות במזומן זה נסבל. על בסיס צבירה — שזה המקום שבו מלווים, תכנון מס, וכל רואה חשבון רציני ידחפו אותך — כל תשלום בסוף החודש צריך להיות מפוצל בין תקופות. ידנית.
אף אחד מאלה אינו סימן שאתה עושה זאת לא נכון. הם מבניים. זה הרגע לפרוש את השקר לצמיתות: מעבר למספר מאות הזמנות בחודש, התאמת תשלומים ידנית אינה בעיית מיומנות שתוכל להתגבר עליה בזהירות יתרה. זוהי אחריות חודשית עם שמך עליה. וחמש אלו הן רק אלו שתיתקל בהן ראשונות — שגיאות סנכרון נפוצות וכיצד לתקן אותן מקטלג את מכלול מצבי הכשל שכל אוטומציה צריכה לטפל בהם, ממוצרים שלא מופו ועד רשומות כפולות.
השיטה האוטומטית: כיצד אמור להיראות יישוב
הנה השינוי. כל מה שלמדת זה עתה — חשבון הנעילה, התרגום מגולמי לנקי, ערך היומן המאוזן — אינו נזרק כאשר אתה מבצע אוטומציה. זה בדיוק מה שכלי סנכרון תקין בונה עבורך. השיטה האוטומטית אינה שיטה שונה. זו אותה שיטה, המבוצעת על ידי תוכנה הקוראת כל הזמנה, החזר, עמלה והתאמה ישירות מ-Shopify.
ההגדרה עצמה היא ארבעה שלבים:
- חבר את QuickBooks Online. ממסך החיבורים של LedgerPort, אשר את QuickBooks — כמה קליקים, והקישור פעיל. תחילת עבודה עם LedgerPort עובר דרך כל מסך.
- חבר את חנות ה-Shopify שלך. התקן מחנות האפליקציות של Shopify או התחבר מדשבורד LedgerPort; החיבור מאומת באופן מיידי.
- בחר סיכום יומי כשיטת הסנכרון שלך. ערך יומן אחד ליום, המאגד כל הזמנה במבנה המדויק שבנית בשלב 4 לעיל — וזוהי רשימה נפתחת, לא פרויקט תצורה. הבנת שיטות סנכרון הזמנות משווה את כל חמש השיטות.
- ערכי יומן תשלומים מופיעים. מכאן ואילך, כל תשלום מייצר אוטומטית ערך מאוזן משלו. העבודה היחידה שנותרה היא התאמת הזנת הבנק.
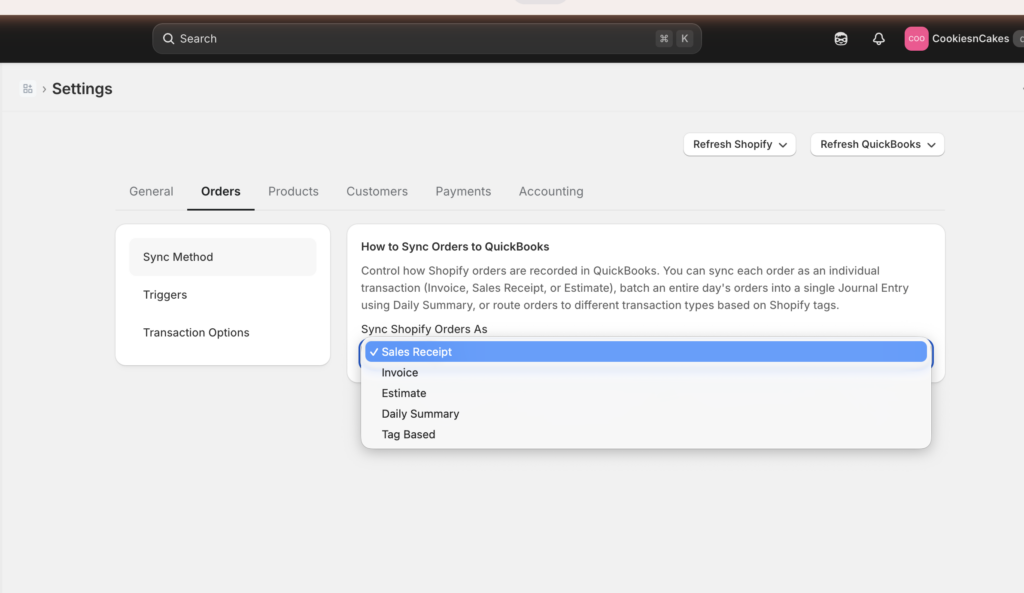
איך נראית הגדרת התאמת תשלומים נכונה ואוטומטית של Shopify בתוך QuickBooks:
- ערכי יומן לכל תשלום, שנוצרו אוטומטית. עבור כל תשלום, הכלי מפרסם את אותו מבנה שבנית בשלב 4 — מכירות ברוטו, משלוח, חבות מס מכירה, עמלות כהוצאה, החזרים כהכנסה נגדית, נטו לחשבון הנעילה. פתח אחד והוא נקרא כמו הערך שעשית ביד, כי הוא *זה* הערך.
- חשבון הנעילה, מתוחזק עבורך. כל ערך תשלום נוחת בו; כל הפקדת בנק יוצאת ממנו. מקרי קצה שזוללים את הערבים שלך — החזרים חוצי-תשלומים, עמלות חיוב חוזר, תיקוני עמלות — מסווגים מנתוני העסקאות של Shopify במקום מהונדסים לאחור מקובץ CSV.
- ההתאמה הופכת להתאמה, לא לחישוב. כאשר ההפקדה מגיעה להזנת הבנק שלך, QuickBooks מוצא ערך בסכום זהה שממתין כבר. אתה לוחץ התאם. סוף החודש הוא אימות: האם חשבון הנעילה מתאפס? הוא מתאפס, ואתה יכול להוכיח זאת.
אבל למה חשבון הניקוי האוטומטי מתאפס בפועל, כאשר החשבון הידני המשיך לסטות? טריגרים של סנכרון. LedgerPort לא רושם הזמנה ברגע שהיא מופיעה ב-Shopify — הוא ממתין עד שההזמנה תגיע לסטטוס התשלום שתבחר, וההגדרה המומלצת לרוב החנויות היא בתשלום בלבד. זה אומר שכל רשומה שמגיעה לחשבון הניקוי מייצגת כסף ש-Shopify גבה בפועל. תשלומים ממתינים, הזמנות שאושרו אך מעולם לא נגבו, והזמנות שבוטלו (לא נכללות כברירת מחדל) לעולם לא נכנסות אליו, כך שההתאמה בין תשלום לחשבון ניקוי אינה חיפוש אחר רעש דמיוני — הקלטים סוננו מראש כדי להתאים למה ש-Shopify ישלם בפועל. וכאשר משהו נכשל, הוא נכשל בקול רם: כל כשל מקבל שגיאה בשם — אסימון QuickBooks שפג תוקפו מתועד כנפוץ ביותר, עם מוצרים לא ממופים ושדות חובה חסרים קרוב מאחור — QuickBooks מגביל קצב במהלך דחיפות גדולות מנסה שוב אוטומטית, וכל רשומה שנכשלה נשארת ניתנת לדחיפה מחדש. שום דבר לא נעלם בשקט בין Shopify לספרים שלך.
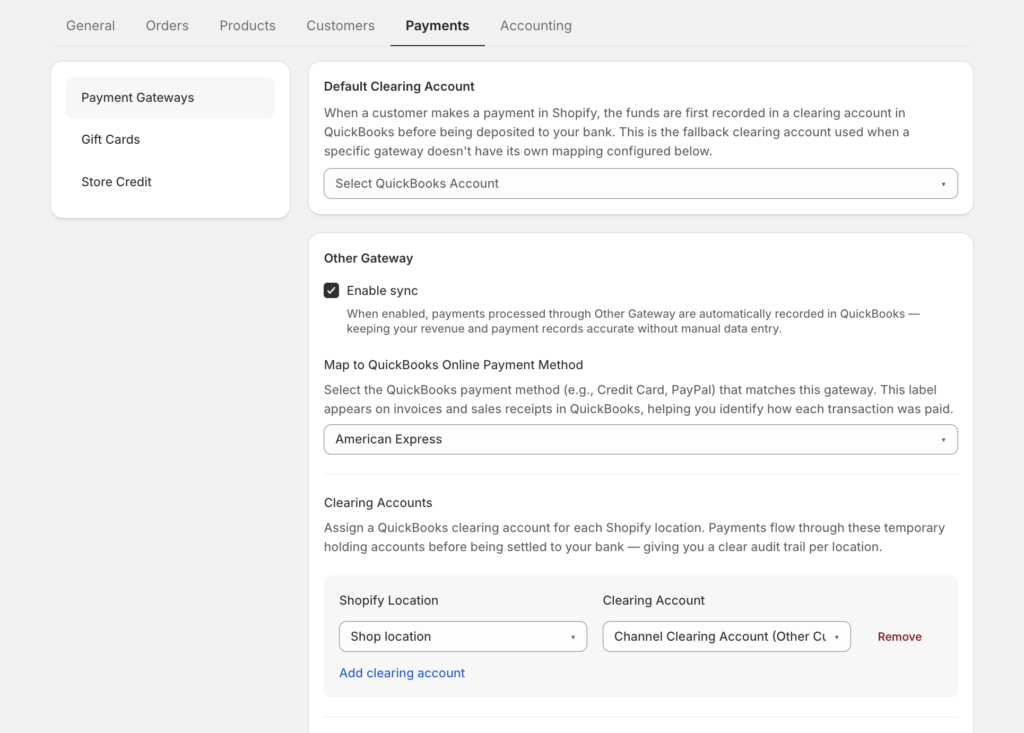
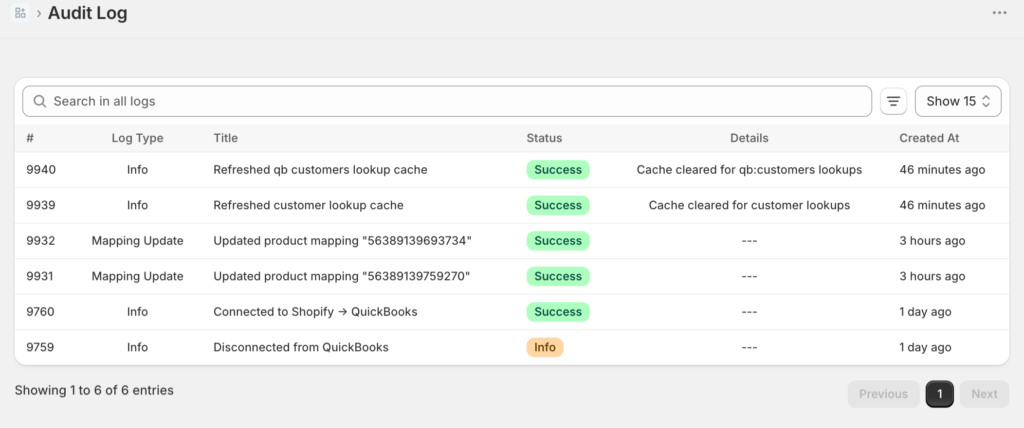
ולאימות יש בית: כל רשומה מסונכרנת — כל תשלום, הזמנה והחזר — מקבלת רשומת יומן עם הסטטוס שלה, ואם היא נכשלה, הסיבה לכך. זהו יומן הביקורת, וזה ההבדל בין כלי ששופך נתונים ל-QuickBooks לבין כלי שאתה באמת יכול לבדוק. אם משהו זקוק לדחיפה — למשל, הזמנה שנכשלה על מוצר לא ממופה — אתה מתקן את המיפוי ו מסנכרן מחדש רק את ההזמנה הזו, ללא צורך בכרטיס תמיכה.
זוהי קטגוריית הכלים שלפעמים נקראת סנכרון תשלומים או מחבר חשבונאות מסחר אלקטרוני. LedgerPort היא הגרסה שלנו לכך — היא מחברת את Shopify (כולל Shopify Plus) ו-WooCommerce ל-QuickBooks Online, ותכונת ההתאמה מבצעת בדיוק את עבודת התרגום שתוארה לעיל.
שתי הערות כנות, כי הן חשובות. ההגדרה אינה אפסית: החיבור לוקח כ-15 דקות, ואתה צריך להקדיש עוד כמה דקות לבדיקת מיפוי החשבונות כך שמכירות, עמלות ומסים ינחתו בתרשים החשבונות שלך, לא בתרשים גנרי. ותוכניות התמחור שונות — התוכנית החינמית מסנכרנת עד 30 הזמנות בחודש עם סנכרון לפי דרישה, בעוד שיומני תשלומים אוטומטיים וטיפול בעמלות נמצאים בשכבת Scale. דף התמחור מכיל את הפירוט המלא. אם אתה מבצע 500–5,000 הזמנות בחודש, אתה כבר מזמן מעבר לנקודה שבה המתמטיקה מעדיפה את הכלי.
ידני לעומת אוטומטי: ההשוואה
| שיטה ידנית | שיטה אוטומטית | |
|---|---|---|
| זמן הגדרה | ~ שעה (חשבונות + לימוד הרישום) | ~ 15 דקות לחיבור, בתוספת בדיקת מיפוי |
| זמן חודשי | 4–8 שעות ב-500–2,000 הזמנות/חודש; גדל עם הנפח | ~ 20 דקות אימות |
| שיעור שגיאות | עולה עם הנפח — תזמון החזרות, חיובים חוזרים ופיצולי תקופות הם האשמים הרגילים | כמעט אפס בתרגום; שגיאות צפות באופן גלוי בחשבון הניקוי |
| מעבדים מרובים | תהליך ידני מקביל לכל שער | מטופל לפי שער, מבנה זהה |
| מדרגיות | נשבר איפשהו בין 300 ל-1,000 הזמנות בחודש | אותן 20 דקות ב-500 או 50,000 הזמנות |
כיצד נראה סוף חודש לאחר ההגדרה
הנה ההגדרה, ואז הנה סוף החודש החדש שלך.
אתה פותח את QuickBooks בראשון לחודש. הזנת הבנק מראה 21 הפקדות של Shopify; כל אחת כבר עם רישום יומן תואם שמחכה. התאם, התאם, התאם. אתה פותח את חשבון הפיקדון: אפס. אתה מריץ את דוח רווח והפסד: עמלות בשורה משלהן, הכנסות ברוטו, מס מכירות יושב בחשבון ההתחייבות שבו רואה החשבון שלך מצפה לו. אתה בודק מדגמית תשלום אחד מול Shopify — הוא מסתכם עד הפני, כולל ההחזר החלקי המעצבן מה-14.
עשרים דקות. גמור. ערימת הלשוניות של יום חמישי בערב — דוח התשלומים, מסך רישום היומן, הדרכה מספר ארבע — פשוט אינה חלק מהחודש שלך יותר. לא בגלל שהפכת זהיר יותר, אלא בגלל שהחלק הזהיר הפך אוטומטי.
שתי נהלים שומרים על כך. הראשון הוא טקס סוף החודש עצמו: פתח את יומן הביקורת, סנן סטטוס ל-שגיאה, תקן את כל מה שהשגיאות מציינות, ואז סנכרן מחדש את הרשומות המתוקנות בכמות גדולה. כאשר הכל קורא מסונכרן, הסגירה מאומתת — לחיצת המסנן לוקחת כ-30 שניות, וברוב החודשים זה כל מה שנדרש.
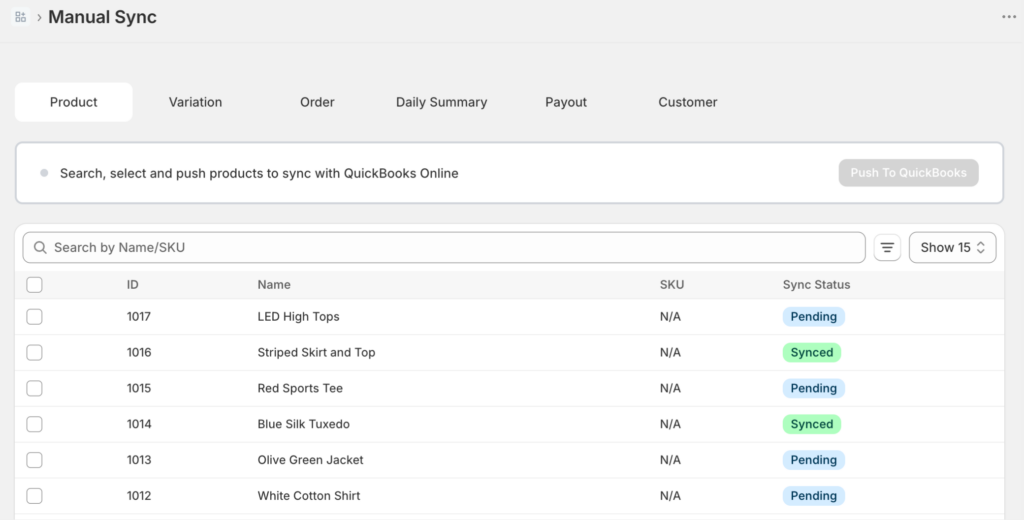
השני הוא תרחישי ההדרכה המדלגים: חיבור QuickBooks מתנתק ואף אחד לא שם לב במשך שלושה ימים. ההתאוששות היא מתכון מתועד, לא שחזור CSV. עבור אל סנכרון ידני » הזמנות, הגדר את טווח התאריכים למסנן לחלון ההשבתה, הגדר סטטוס ל-לא מסונכרן, לחץ על בחר הכל, ואז סנכרן נבחרים, ואמת ביומן שהכל הגיע. דקות עבודה, אפילו עבור קבוצות גדולות — מגבלות הקצב של QuickBooks במהלך דחיפות גדולות מנסות שוב באופן אוטומטי, כך שאינך צריך להשגיח על התור.
האם זרימת העבודה מסתכמת בזמן אמיתי? משרדי הנהלת חשבונות המפעילים אותה על פני חנויות לקוחות מדווחים על חיסכון ממוצע של 12+ שעות ללקוח בחודש על התאמה, לפי נתוני משרדי השותפים של LedgerPort. זה בקנה מידה של משרד — עבור חנות בודדת, זה לילות השבת שלך בחזרה.
אתה יודע כעת את השיטה הידנית המלאה — ששת החשבונות, הרישום המאוזן, בדיקת האפס. הידע הזה הוא מה שמאפשר לך *לאמת* מערכת אוטומטית במקום לסמוך עליה בעיניים עצומות. אז דלג על 21 רישומי היומן שנבנו ידנית בחודש הבא ושמור על שלב האימות: חבר את חנות ה-Shopify שלך ל-LedgerPort בחינם →. תוכנית החינם אינה עולה דבר, וכל תוכנית בתשלום נושאת אחריות להחזר כספי של 14 יום — אם חשבון הפיקדון שלך לא יתאפס, תקבל החזר מלא, ללא שאלות.