


- 1Ay Sonu Kapanışına Kadar Doğru Görünen Hesap Planı
- 2Shopify'ın Net Ödeme Yapısı Neden Mimari Bir Sorun
- 3Kararlar 1 ve 2: Brüt Gelir Hesapları ve Mahsup Hesabı
- 4Kararlar 3 ve 4: Ücret Ayrımı ve İade İşlemleri
- 5Karar 5: Satış Vergisi Başlangıçtan İtibaren Bir Yükümlülük Olarak
- 6Bir Günde Kapanan Hesap Planı
- 7Bir karar daha: bu hesaplara gönderilecek senkronizasyon yöntemi
Yeni bir Shopify müşterisi alırsınız. QuickBooks Online'da hesap planını oluşturursunuz — beş kategori, mantıklı alt hesaplar, standart konvansiyona uyan hesap numaralandırması. Shopify entegrasyonunu bağlarsınız. Kağıt üzerinde her şey doğru görünüyor.
Sonra ilk Shopify ödemesi gelir.
Shopify bankaya 14.200 $ yatırdı. QuickBooks 15.800 $ Shopify geliri gösteriyor. Shopify panosu 16.100 $ brüt satış bildiriyor. Aynı ayın faaliyetine ait üç farklı rakam, hiçbiri uyuşmuyor. Boşluğu kovalamak için dört saat harcarsınız. Sonunda bulursunuz: banka transferleri olarak kaydedilen ücretler, doğru hesaplara göre gönderilmeyen iadeler, gelirde duran bir vergi toplama tutarı yerine bir yükümlülük. Hesap planında hiçbir şey eksik değildi. Sadece Shopify'ın parayı nasıl hareket ettirdiği için tasarlanmamıştı.
Çoğu Hesap Planı rehberinin dayandığı yanlış varsayım şudur: doğru hesaplar doğru kategorilerde olduğu sürece, mutabakat işe yarayacaktır — bu sadece her ay işi yapma meselesidir. Shopify için bu doğru değil. Hesap adları ve numaralandırma temel gereksinimlerdir. Shopify kitaplarınızın mutabakatını neyin belirlediği, hesap planının Shopify'ın fonları nasıl dağıttığıyla mimari olarak uyumlu olup olmadığıdır — brüt gelir olarak değil, net ödeme olarak. Beş özel eşleştirme kararı, ay sonu kapanışının 30 dakika mı yoksa öğleden sonranın çoğu mu süreceğini belirler.
ZAMAN FARKI
4 saat
vs. 30 dakika — aynı ay sonu kapanışı
Fark, ne kadar iş yaptığınız değil. Hesap planının en başından itibaren Shopify'ın net ödemesini doğru bir şekilde alacak şekilde tasarlanıp tasarlanmadığıdır.
Ay Sonu Kapanışına Kadar Doğru Görünen Hesap Planı
Çoğu standart hesap planı şablonu — e-ticarete özel olanlar bile — gelirin brüt gelir olarak geldiği varsayımına dayanır. 100 dolarlık bir satış, 100 dolarlık gelir olarak kaydedilir. Ücretler ödendiğinde kaydedilir. Çoğu işletme bu şekilde çalışır.
Shopify bu şekilde çalışmaz.
Shopify, bir müşteri 100 $ ödediğinde size 100 $ göndermez. Size net bir ödeme gönderir — brüt satışlar eksi ödeme işlem ücretleri, eksi iadeler, eksi Shopify işlem ücretleri, bazen sizin adınıza tahsil edilen satış vergisi eksi, hepsi bir ila on dört günlük siparişleri kapsayan tek bir banka transferinde toplanır. Bu ödeme müşterinizin banka hesabına ulaştığında, en az beş farklı finansal olayı temsil eder. Hesap planınızın bu beşini de alıp ayırması gerekir, aksi takdirde her ay mutabakat başarısız olur.
Hesaplar yanlış değil. Mimari yanlış.
Shopify'ın Net Ödeme Yapısı Neden Mimari Bir Sorun
Tipik bir Shopify ödemesinin aslında neleri içerdiğini, kalemler halinde dökümü aşağıdadır:
- Brüt satışlar — ödeme dönemindeki tüm siparişlerden elde edilen ana gelir
- Ödeme işlem ücretleri — Shopify Payments (Temel plan) için çevrimiçi işlem başına tipik olarak %2,9 + 0,30 ABD doları; ödeme öncesinde düşülür
- Shopify işlem ücretleri — mağaza Shopify Payments kullanmıyorsa işlem başına ek %2; eski planlarda yaygındır
- İade edilen tutarlar — ödeme dönemindeki iade edilen siparişler için brüt iadeler
- Pazar yeri aracılı satış vergisi — Shopify'ın topladığı ve satıcı adına doğrudan eyalet yetkililerine ödeyeceği tutarlar (ABD eyaletlerinin çoğunda Shopify pazar yeri aracısıdır)
Entegrasyonunuz, doğrudan yatırılan tutarı “Shopify Satışları” gelir hesabına eşlediğinde, beş olayın tamamını tek bir sayıya indirgemiş olursunuz. Ücretler zaten düşüldüğü için gelir eksik beyan edilir. Ücret giderleri görünmezdir. Vergi tahsilatını gelir olarak kaydettiğiniz için bilanço hayali bir vergi yükümlülüğü taşır.
Çözüm, ay sonunda geçmişi temizlemek değildir. Her bileşenin otomatik olarak doğru hesaba yönlendirilmesi için hesap planını oluşturmak ve bir takas hesabı aracılığıyla banka mevduatına geri bağlamaktır. Bu, beş özel karar gerektirir. Bunları yanlış yapmanın sonraki maliyeti, firmanızın e-ticaret taahhütlerinde boşa harcadığı zamandır.
Kararlar 1 ve 2: Brüt Gelir Hesapları ve Mahsup Hesabı
Karar 1: Mevduat tutarını değil, brüt satışları gelir olarak kaydedin.
Gelir hesaplarınız, Shopify'ın herhangi bir kesinti yapmadan önce müşterilerin aslında ne kadar ödediğini yansıtmalıdır. Tek bir “e-ticaret satışları” kutusu yerine (Shopify satışları, WooCommerce satışları, toptan satış geliri) her satış kanalı için ayrı gelir hesapları oluşturun. Shopify ve Amazon gelirini tek bir hesaba birleştirdiğinizde, kanal başına kar görünürlüğünü kaybedersiniz ve defterleri yeniden oluşturmadan bunu geri kazanmanın pratik bir yolu yoktur.
Sadece Shopify müşterisi olan bir işletme için temiz bir gelir bölümü şu şekildedir:
- 4100 — Shopify Satışları (brüt, kesintiler öncesi)
- 4110 — Shopify Nakliye Geliri (nakliye müşterilere ücretlendiriliyorsa)
- 4200 — İadeler ve İndirimler (gelir karşıtı)
Gelir hesapları ne satıldığını kaydeder. Banka mevduatı, kesintiler sonrası ne kadar ödendiğini yansıtır. Bu iki sayı yapısal olarak farklıdır ve hesap planınızın bunları birbirine bağlayan bir hesaba ihtiyacı vardır.
Karar 2: Köprü olarak bir takas hesabı kullanın.
Takas hesabı, net ödeme sorununa yönelik mimari çözümdür: brüt satış kredisi girişi, ücret/iade/vergi borçları çıkışı, net banka mevduatı tam olarak eşleşir. Takas hesabı her ödeme döngüsünde sıfıra kapanır. Mutabakat, araştırma değil, mekanik hale gelir.
Bir satış kaydedildiğinde, brüt tutar Shopify Satış gelir hesabına ve bir varlık olarak takas hesabına işlenir. Shopify net ödemeyi yaptığında, takas hesabı kesintileri (ücretler, iadeler, vergi) alır ve sıfıra iner. Banka mevduatı net ödemeyle tam olarak eşleşir. Her bileşen doğru hesaba yerleşir.
Takas hesabı olmadan, tek bir QBO hesabıyla eşleşmeyen bir banka mevduatını mutabık kılmaya çalışırsınız - çünkü tek bir hesapla eşleşmesi gerekmez. Beş finansal olayın netidir. Teki olmadan bir Shopify mutabakatı üzerinde bir akşam geçiren her mali müşavir, bunun nasıl bir his olduğunu tam olarak bilir.
Her ödeme işlemcisi için bir takas hesabı oluşturun. Müşteriniz Shopify Payments ve PayPal kullanıyorsa, bu iki takas hesabı demektir. Bunları karıştırmak, gelir düzeyinde çözmeye çalıştığınız aynı eşleşmeme sorununu takas düzeyinde yeniden oluşturur.
Bu iki kararın nasıl uygulandığı: ürün eşleştirmeleri.
1. ve 2. Kararlar yalnızca QBO'ya gönderim yapan yazılım bunlara uyarsa geçerlidir ve eşleştirmeler bunun gerçekleştiği yerdir. Sıralama kuralı, LedgerPort'un kendi kurulum belgelerinden gelir: önce hesap planını oluşturun, sonra eşleştirin. LedgerPort, sizin bilginiz olmadan hesap oluşturmaz, mevcut QuickBooks hesaplarınıza eşler; bu nedenle bu makalede tasarladığınız yapı, senkronizasyonun uyduğu yapıdır.
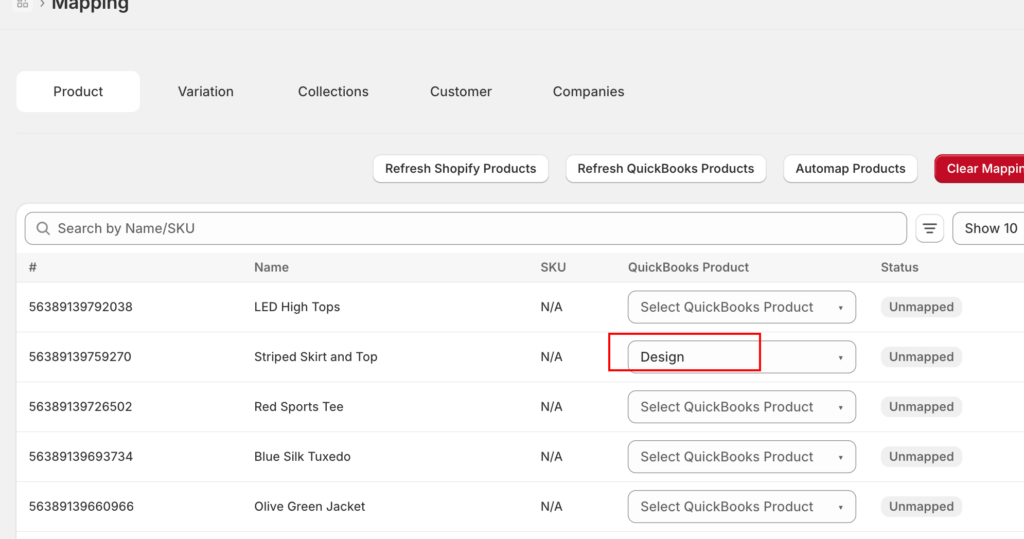
Eşleştirme ekranı aynı zamanda gelir ayrıntı düzeyini de belirlediğiniz yerdir. Her ürün bir QBO öğesine eşlenir ve her öğe bir gelir hesabı taşır. Tek bir “Satış Hesabı” elde etmek için birçok ürünü tek bir öğeye yönlendirin. Ürünleri tek tek eşleştirirseniz, SKU başına gelir ve Stok türündeki öğelerde Maliyet elde edersiniz. Bu, açılır menü olarak sunulan “tek Satış hesabı ile satır başına gelir hesapları” ile aynı karardır.
İki ayrıntı bunu pratikte uygulanabilir hale getirir. Birincisi, hata modu güvenlidir: eşlenmemiş bir ürün içeren bir sipariş, adlandırılmış bir durumla (“Ürün Eşlenmedi”) hata verir ve yanlış bir hesaba gönderilmek yerine bekler, böylece şablon sessizce ihlal edilemez. İkincisi, kurulum bir haftalık açılır menü tıklaması değildir: Otomatik Eşleştirme, Shopify ürünlerini SKU veya ada göre tek bir tıklamayla QBO öğelerine eşler, sonuçları inceleme için işaretler ve yalnızca eksikleri manuel eşleme için bırakır.
Kararlar 3 ve 4: Ücret Ayrımı ve İade İşlemleri
Karar 3: Shopify ücretleri tek bir satır kalemi değildir.
Üç farklı ücret türü Shopify ödemelerinde görünür. Bunları tek bir “Shopify Ücretleri” hesabına toplamak, karın nereye gittiği hakkında anlamlı bir görünürlüğü kaybettirir:
ABONELİK ÜCRETİ
Sabit
Aylık 29-399 ABD Doları platform ücreti; işlem hacmiyle ilgisiz
İŞLEM ÜCRETİ
%0,5-2
Yalnızca Shopify Payments KULLANILMIYORSA alınır; geçildiğinde kaybolur
İŞLEM İŞLEME ÜCRETİ
2.9% + $0.30
İşlem başına; en büyük ücret kategorisi; brüt marjı doğrudan azaltır
QBO'da temiz bir ücret yapısı:
- 6100 — Shopify Aboneliği
- 6110 — Shopify İşlem Ücretleri
- 6120 — Ödeme İşleme Ücretleri
Üçünü tek bir hesaba toplamak, mali müşavirlerin %3'lük marj erozyonunun ödeme işlemeden görünmez olduğu defterleri devralmasının yoludur - ta ki biri brüt marjın fiyatlandırma modelinin öngördüğünden neden daha düşük olduğunu sorana kadar. Bunları ayırmak kurulumda hiçbir maliyet getirmez ve sonrasında her incelemede zaman kazandırır.
Karar 4: İadeler orijinal sipariş yerine ödemeye işlenir.
Bir müşteri bir siparişi iade ettiğinde, Shopify iade tutarını bir sonraki mevcut ödemeden düşer. Ayrı bir banka işlemi oluşturmaz - ödemenin net tutarını azaltır. İade ve İndirimler için karşı hesap, iadenin işlendiği zamanda değil, onu içeren ödeme zamanında iade girişini almalıdır.
Mart ayında bir iade işlenmiş ancak iade Nisan ödemesinde görünmüşse, karşı gelir kaydı Nisan ayına aittir. Bunu Mart ayına kaydetmek bir dönem eşleşmemesi yaratır: Mart geliri düşer, ancak Mart banka mutabakatı nakit etkisi Mart ayında gerçekleşmediği için hala dengelenmez. Dönem eşleşmemeleri, defterlerin çözülmesi için tam bir temizlik gerektirene kadar aydan aya birikir.
Karar 5: Satış Vergisi Başlangıçtan İtibaren Bir Yükümlülük Olarak
ABD'deki çoğu eyalette Shopify bir pazar yeri kolaylaştırıcısıdır - yani Shopify müşterilerden satış vergisini toplar ve doğrudan eyalet vergi dairelerine iletir. Satıcı bu paraya asla dokunmaz. Satıcının vergi borcu yoktur; Shopify zaten ödemiştir.
Shopify'nin topladığı satış vergisi, Shopify kontrol panelindeki brüt sipariş toplamlarında görünür, ancak hiçbir zaman satıcının banka hesabına akmaz ve satıcının geliri değildir. Gelir hesabınız vergi dahil brüt sipariş toplamlarını kaydediyorsa, geliri fazla gösteriyor ve bilanço üzerinde hayali bir yükümlülük oluşturuyorsunuz.
Doğru kurulum iki yükümlülük hesabı gerektirir:
- Ödenecek Satış Vergisi — satıcının doğrudan topladığı ve ödediği vergiler için (toptan satış gibi pazar yeri olmayan kanallar veya pazar yeri kolaylaştırıcısı kurallarının geçerli olmadığı eyaletler)
- Pazar Yeri Vergi Kesintisi (veya “Toplanan Shopify Vergisi”) — Shopify'nin satıcı adına topladığı ve ödediği vergiler için; Shopify'nin ödemesiyle yükümlülük ortadan kalktığı için ödeme döngüsünden sonra sıfıra netleşir, satıcının değil
Müşteriniz birden fazla kanalda satış yapıyorsa — Shopify, doğrudan web sitesi, toptan satış — vergi uygulaması kanala göre farklılık gösterir. Tek bir “Ödenecek Satış Vergisi” hesabı, Shopify tarafından işlenen vergi ile satıcı tarafından işlenen vergi arasındaki ayrımı yapamaz ve vergi zamanında bu ayrım önemlidir.
LedgerPort'ta 5. Karar, aylık bir disiplin yerine bir ayar olarak sunulur. Senkronizasyon yapılandırmasının Vergiler sekmesinde bir Satır Kalemi Vergisi seçeneği bulunur: platform tarafından toplanan vergi, açılır menüden seçeceğiniz bir yükümlülük hesabına yönlendirilen kendi satırı olarak gönderilir. “Vergi gelirden değil, yükümlülüktür” kuralı, hatırlaması gereken birinin kuralı olmaktan çıkar ve senkronizasyonun gönderebileceği tek yol haline gelir.
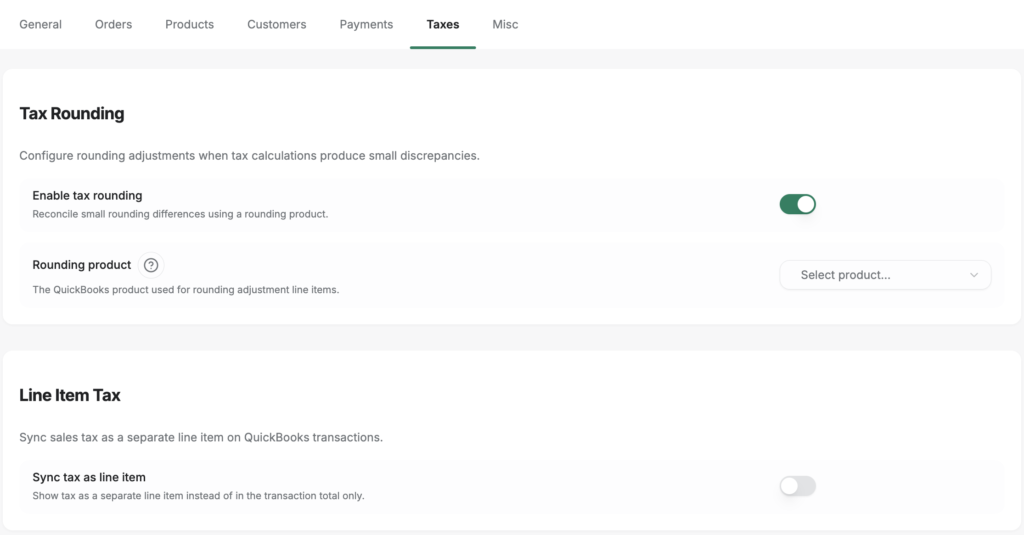
Aynı sekme, kimsenin açıklamadığı detayı tutar: vergi yuvarlaması. Platformun vergi matematiği ve QuickBooks'in vergi matematiği bazı siparişlerde bir veya iki sent fark eder ve bu sentlerin bir yeri olmadığında, defterler sipariş başına birkaç sent tutarsız bir karmaşaya sürüklenir. Vergi Yuvarlama ayarı, farkı emen bir yuvarlama ayarlama satırı ekler - bu nedenle defterler "yeterince yakın" yerine birebir tutar. Yeterince yakın, kapanmaz.
Bir Günde Kapanan Hesap Planı
Beş karar da yerindeyken, ay sonu işlemleri şu şekilde ilerler: her Shopify ödemesi takas hesabından geçer. Brüt satışlar kredisi girer. Ödeme işlem ücretleri, iadeler ve pazar yeri vergi borcu çıkar. Net banka mevduatı kaydedilir. Takas hesabı sıfıra kapanır. Banka mutabakatı, araştırma yoluyla değil, yapı gereği dengelenir.
Bu 20 dakikalık bir işlemdir. Fark, işin hacmi değil — hesap tablosunun veriyi doğru alacak şekilde tasarlanıp tasarlanmadığıdır.
Ön yatırım gerçektir. Bu mimariyi yeni bir müşteri için doğru bir şekilde oluşturmak ilk seferde iki ila üç saat sürer — genel bir şablonu kopyalamaktan daha uzun sürer. Ancak alternatif, bu saatleri veya daha fazlasını her ay, süresiz olarak harcamaktır.
Beş veya on Shopify müşterisi yöneten CPA'lar için bu mimari, tekrarlanabilir bir şablonun temelini oluşturur. Aynı beş karar, QBO'daki her Shopify mağazası için geçerlidir. Bir kez doğru bir şekilde oluşturun ve uygulamayı, her yeni görevle problemi yeniden öğrenmek yerine, uygulama genelinde uygulayın.
Bir karar daha: bu hesaplara gönderilecek senkronizasyon yöntemi
Bir hesap planı, hesaplar mevcut olduğunda bitmez. Hangi tür işlemin onlara gönderileceğine karar verdiğinizde biter. Bir senkronizasyon aracında bu kararın bir adı vardır: senkronizasyon yöntemi. LedgerPort'ta bu, uygulamadaki sol kenar çubuğundan erişilen Sync Config » Orders » Sync Method'da beş seçeneği olan tek bir açılır menüdür ve her seçenek, az önce oluşturduğunuz hesaba farklı bir şey sorar.
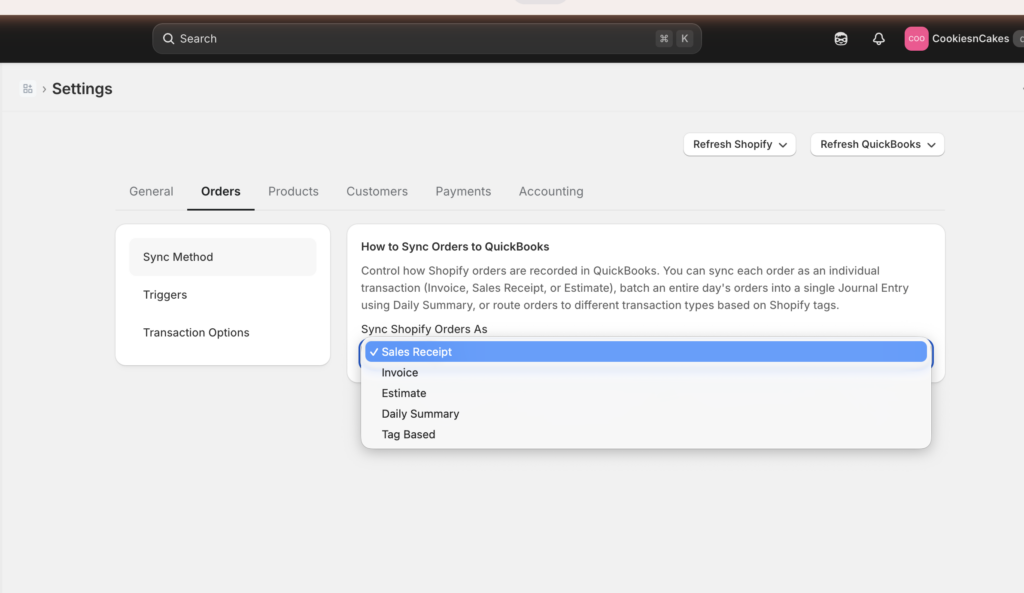
- Satış Fişi - sipariş başına bir fiş, satır öğeleri, vergiler, nakliye ve indirimlerle birlikte gelir ve gelir ile takas hesabına gönderilir. Alacak hesabı gerekmez.
- Fatura - sipariş başına iki kayıt: fatura kesildiğinde Fatura, Shopify ödemeli olarak işaretlediğinde Ödeme. Bunu seçerseniz, hesabınız açık alacak hesaplarına ihtiyaç duyar.
- Teklif - gönderilmeyen bir kayıt; dönüştürülene kadar hiçbir şeye dokunmaz. Belgeler bunun ne kadar nadir olduğu konusunda açık sözlüdür: "Emin değilseniz, muhtemelen ihtiyacınız yoktur."
- Günlük Özet - o günün tüm siparişlerini toplayan günlük bir işlem kaydı. Seçmek, hemen altındaki hesap eşleme alanlarını gösterir.
- Etiket Tabanlı - Shopify sipariş etiketleri, siparişleri farklı işlem türlerine yönlendirir (
toptan→ Fatura,perakende→ Satış Fişi,senkronize-etme→ atlandı), bu nedenle karma perakende/toptan satış mağazasının hem alacak hem de fiş tarafı hesaplarına ihtiyacı olabilir.
Günlük Özeti'nin ne yaptığını yakından inceleyin: seçtiğiniz anda yazılım, günlük işlem kaydının gönderileceği hesapları adlandırmanızı ister. Bu eşleme alanları, bu makalenin beş kararıdır, form alanları olarak sunulur - brüt gelir, takas, ücretler, iadeler, vergi. Yukarıdaki hesabı oluşturduysanız, bunları tek seferde doldurursunuz. Oluşturmadıysanız, bu, bunun belirginleştiği ekrandır.
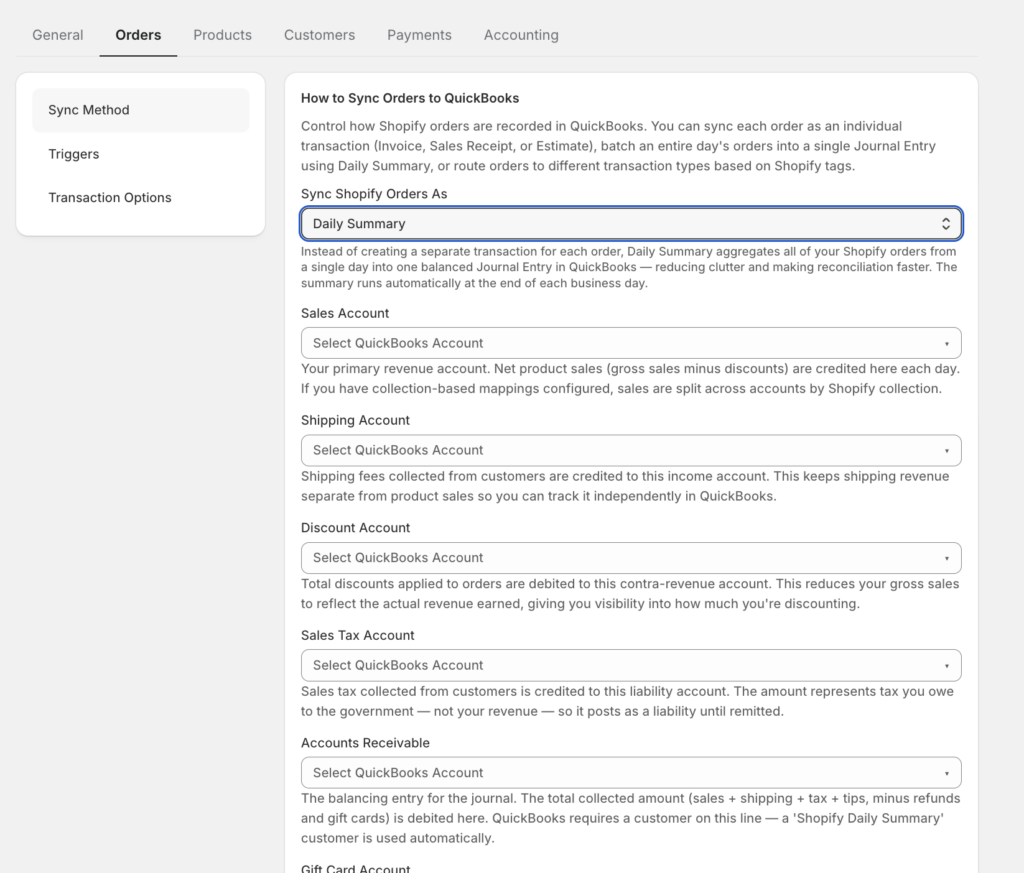
Karar mantığı kısadır. Standart DTC mağazası, ödeme sırasında ödenir: Satış Fişi - belgelerin kendi varsayılanı, "çoğu mağaza için doğru başlangıç noktası." B2B veya ödeme koşulları: Fatura. Yüksek hacim - günde yaklaşık 100 veya daha fazla sipariş - toplamlarla çalışan bir muhasebeci ile: Günlük Özet, bu da 3.000 siparişlik bir ayı ~30 işlem kaydına dönüştürür, 3.000 kayıt yerine.
Ve bu kararı güvenli hale getiren kural: senkronizasyon yöntemini değiştirmek, zaten senkronize edilmiş siparişleri asla yeniden yazmaz. Yalnızca ileriye dönük olarak uygulanır. Bir yöntem seçin, bir ödeme döngüsünün takas hesabından geçmesini izleyin ve şekil yanlışsa tekrar gözden geçirin — zaten kapattığınız defterler kapalı kalır.
LedgerPort eşlemeyi otomatik olarak halleder — senkronizasyon, her ödeme döngüsünde brüt satışları, ücret satır öğelerini, iadeleri ve pazar yeri tarafından toplanan vergiyi doğru hesaplarına gönderir, böylece takas hesabı manuel müdahale olmadan kapanır. Hesap tablosunun bu veriyi alacak şekilde doğru yapılandırılması hala gereklidir, ancak yukarıdaki beş karar size tam olarak bu yapıyı verir.
Yeni bir Shopify müşterisi kuruyorsanız veya mutabakatı yapılmayan bir defter devralıyorsanız, ilk bakmanız gereken beş yer burasıdır. Yukarıdaki kararlardan herhangi biri verilmediyse, dört saatlik mutabakatın nedeni budur. Hesap planını doğru ayarlamak, mali müşaviriniz istediğinde vergiye hazır defterlere sahip olmanın da temelini oluşturur — ay sonunu temiz yapan aynı beş karar, yıl sonunu da basit hale getirir. LedgerPort'un çoklu müşteri uygulaması genelindeki eşleştirmeyi nasıl yönettiğini ledgerport.com/cpas adresinde görün veya ücretsiz başlayın.