
LedgerPort の同期設定にある会計タブは、Shopify 接続専用です。これは WooCommerce には適用されない設定であり、ほとんどの Shopify マーチャントがセットアップ中に少なくとも一度は確認する必要があるものです。具体的には、税金が QuickBooks にどのように転送されるか、丸め誤差をどのように処理するか、そして異なる Shopify チャネル、場所、顧客グループ、または注文タグからの収益を個別の QuickBooks 口座、クラス、または場所にルーティングできるオプションの分類ルールが含まれます。
ほとんどのマーチャントは、税金設定と高度なセクションのみを使用します。チャネル、場所、顧客セグメント、注文タグの 4 つのマッピング機能は、QBO 内で事後的に手動で再分類する必要なく、事業運営構造(小売対卸売、店舗 A 対店舗 B、オンライン対 POS)を QuickBooks に反映させたい企業向けです。
LedgerPort » 同期設定 に移動し、会計 タブをクリックします。このタブは、アクティブな接続が Shopify ストアの場合にのみ表示されます。

会計タブで変更を行った後、画面下部にフローティングの 保存バー が表示されます。変更を適用するには 変更を保存 をクリックします。
税金設定
デフォルトでは、QuickBooks は請求書に独自の税率を適用しますが、これは Shopify からの同期時に問題を引き起こします。Shopify はすでに顧客から正確な税金を計算して徴収しており、QuickBooks がその上に再計算すると不一致が生じます。税金を品目として表示 オプションは、Shopify の事前計算済み税額を QBO 請求書の専用品目として転送し、他のすべての品目を非課税としてマークすることで、QuickBooks が追加の税金を適用しないようにすることで、この問題を解決します。
税金品目を有効にするには:
- 税金を品目として表示 にチェックを入れることができます。
- 税金商品 フィールドで、税金品目として使用したい QuickBooks の商品またはサービス項目を選択します。これは通常、事前に QuickBooks で設定した「売上税」のような名前の在庫なし項目です。
- オプションで、税金の説明 を入力して、請求書の品目に表示されるラベルをカスタマイズできます(例:「Shopify 売上税」)。
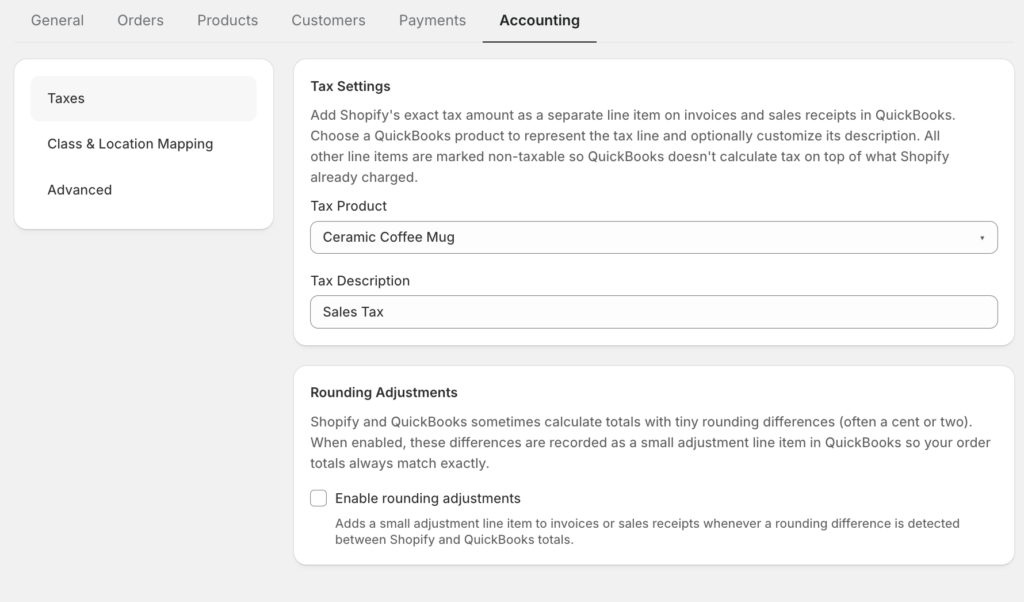
注意: 税金商品は、ドロップダウンに表示される前に QuickBooks アカウントに存在する必要があります。リストが空の場合は、まず QuickBooks で項目を作成してから、ここに再度戻ってください。
丸め調整
税金が正しく同期されていても、端数処理により、Shopifyの注文合計とQuickBooksの明細項目の合計との間に、通常は数セントのわずかな差異が生じることがあります。これらの差異を放置すると、請求書に実際の支払いと一致しない未払い残高が表示され、帳簿上の誤った支払いの不一致がトリガーされる可能性があります。
端数処理調整を有効にすると、LedgerPortは残額を専用のQuickBooks製品に投稿し、請求書の合計が正確に一致するようにします。
端数処理調整を有効にするには:
- 「端数処理調整を有効にする」というチェックボックスをオンにします。
- 「端数処理製品」をドロップダウンから選択します。これは、端数処理の違いを吸収するために作成したQuickBooksの商品です(一般的に「端数処理調整」などの名前が付けられています)。ここに投稿される金額は、通常、注文あたり0.01ドル未満です。
注意:この設定は、今後LedgerPortによって作成される請求書または販売レシートにのみ影響します。すでに同期されたレコードには遡って適用されません。
チャネルマッピング
Shopifyは、オンラインストア、Shopify POS、Instagram、Facebookなど、複数のチャネルで販売しています。デフォルトでは、LedgerPortはすべてのチャネル収益を同じQuickBooksアカウントに投稿します。チャネルごとの内訳をQuickBooksで確認したい場合(たとえば、POS収益とオンライン収益を比較するため)、チャネルマッピングを使用すると、各Shopifyチャネルを特定のQuickBooks銀行口座、クラス、または場所に割り当てることができ、注文が同期されるときにその分類が自動的に適用されます。
チャネルマッピングを設定するには:
- 「チャネルマッピングを有効にする」をオンにします。
- 表示される入力行で、最初のドロップダウンから「Shopifyチャネル」を選択します。リストには、現在Shopifyストアで公開されているチャネルが表示されます。
- 「QuickBooksクラス」、「QuickBooks場所」、または「QuickBooks銀行口座」のいずれか(1つ、2つ、またはすべて)を割り当てます。
- 「追加」をクリックします。マッピングが下のテーブルに表示されます。
- 個別に分類したいチャネルごとに繰り返します。
マッピングを削除するには、その行のゴミ箱アイコンをクリックします。
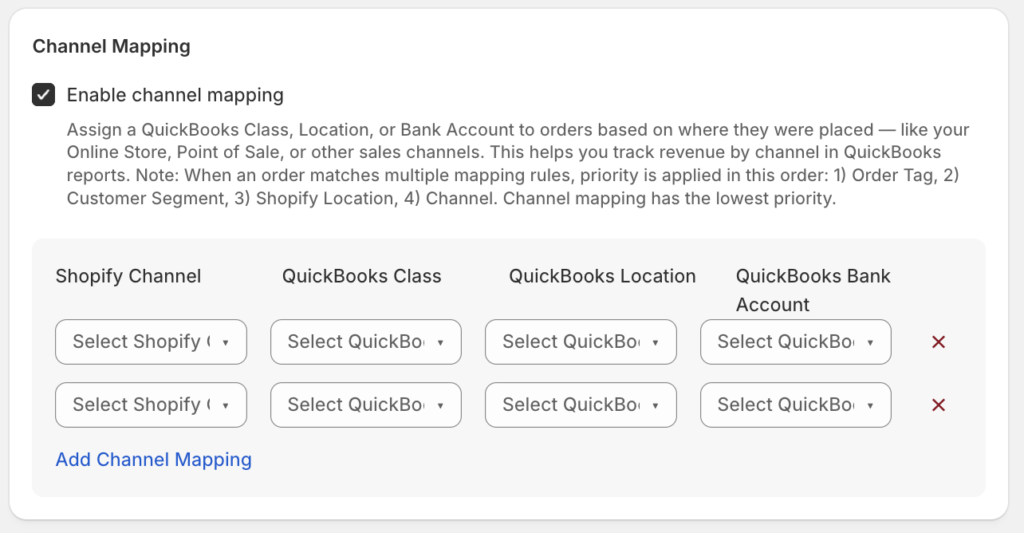
注意:「追加」ボタンがアクティブになる前に、Shopifyチャネルと少なくとも1つのQuickBooksの宛先を選択する必要があります。
Shopify場所マッピング
Shopifyストアが複数の物理的な場所(別々の倉庫、小売店、またはフルフィルメントセンター)から運営されている場合、Shopifyは各注文をそれを処理した場所に関連付けます。デフォルトでは、これらの場所の違いはQuickBooksでは表示されません。場所マッピングを使用すると、各Shopifyの場所をQuickBooksの場所またはクラスに割り当てることで、その情報を引き継ぐことができ、手動でエントリを再コーディングすることなくQBOで場所レベルのレポートを実行できます。
場所マッピングを設定するには:
- 「Shopify場所マッピングを有効にする」をオンにします。
- 入力行で、最初のドロップダウンから「Shopifyの場所」を選択します。リストには、Shopifyアカウントの有効な場所が表示されます。
- QuickBooks の場所、QuickBooks クラス、またはその両方を割り当てます。
- 「追加」をクリックします。マッピングが下のテーブルに表示されます。
- 個別に追跡したい Shopify の場所ごとに繰り返します。
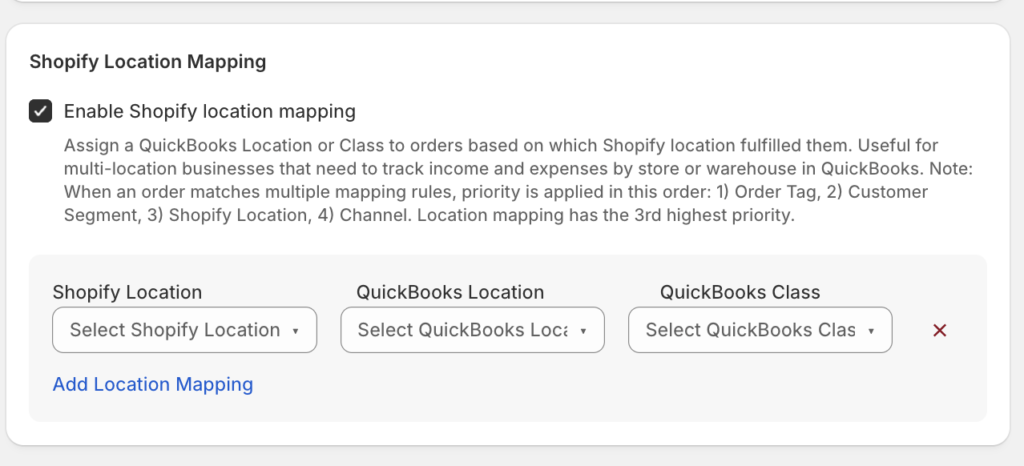
注意: Shopify の場所は、ライブの Shopify アカウントから取得されます。場所がドロップダウンに表示されない場合は、Shopify 管理画面 » 場所でアクティブであることを確認してください。
顧客セグメントのマッピング
Shopify では、購入履歴、タグ、地理情報、または顧客の種類(例: 卸売と小売)などの基準に基づいて保存されたグループである顧客セグメントを作成できます。これらのセグメントが会計処理で意味を持つ場合、顧客セグメントのマッピングは、各セグメントからの注文に QBO クラスまたは場所を自動的に割り当てることで、その分類を QuickBooks に引き継ぎます。
これは、卸売と小売の収益を QuickBooks で個別に追跡したい B2B マーチャント、またはロイヤルティティアを持つ企業が、QBO で各請求書を手動でタグ付けすることなく、各ティアを個別にレポートしたい場合に特に役立ちます。
顧客セグメントのマッピングを設定するには:
- 顧客セグメントのマッピングを有効にするにチェックを入れます。
- 最初のドロップダウンから 顧客セグメント を選択します。
- QuickBooks クラス、QuickBooks の場所、またはその両方を割り当てます。
- 追加 をクリックします。
- 分類したいセグメントごとに繰り返します。
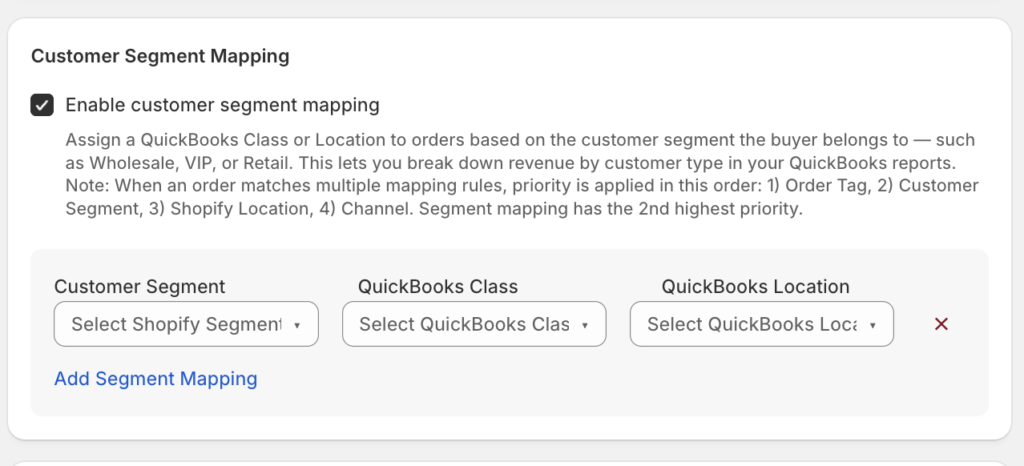
注意: 顧客セグメントは Shopify アカウントから取得されます。セグメントは、ここのドロップダウンに表示される前に Shopify に存在している必要があります。
注文タグのマッピング
注文タグは、プロモーション注文、ギフトカードの購入、B2B 注文、または定義したその他のグループをフラグ付けするために、あなたまたはあなたの自動化が Shopify 注文に付けるラベルです。注文タグのマッピングは、それらのタグを QuickBooks の分類に変換し、特定のタグが付いた注文に QBO クラスまたは場所を自動的に割り当てます。
たとえば、チームがパートナー紹介プログラムを通じて行われたすべての注文に「partner-referral」のようなタグを付ける場合、そのタグを専用の QuickBooks クラスにマッピングして、QBO 内で手作業を行うことなくパートナーソースの収益を追跡できます。
注文タグのマッピングを設定するには:
- 注文タグのマッピングを有効にするにチェックを入れます。
- 入力行で、注文タグ フィールドに Shopify の注文タグの正確なテキストを入力します。タグは大文字と小文字を区別します。Shopify に表示されるとおりに正確に入力してください。
- QuickBooks クラス、QuickBooks の場所、またはその両方を割り当てます。
- 追加 をクリックします。
- ルーティングしたいタグごとに繰り返します。
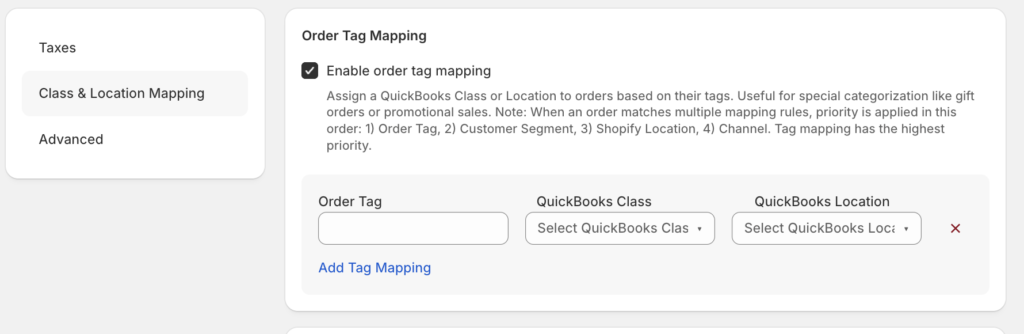
注意: 注文タグのマッピングは、正確な一致テキストで機能します。注文に複数のタグが付いている場合、LedgerPort は、ルールが構成されている最初のタグのマッピングを適用します。
高度な設定
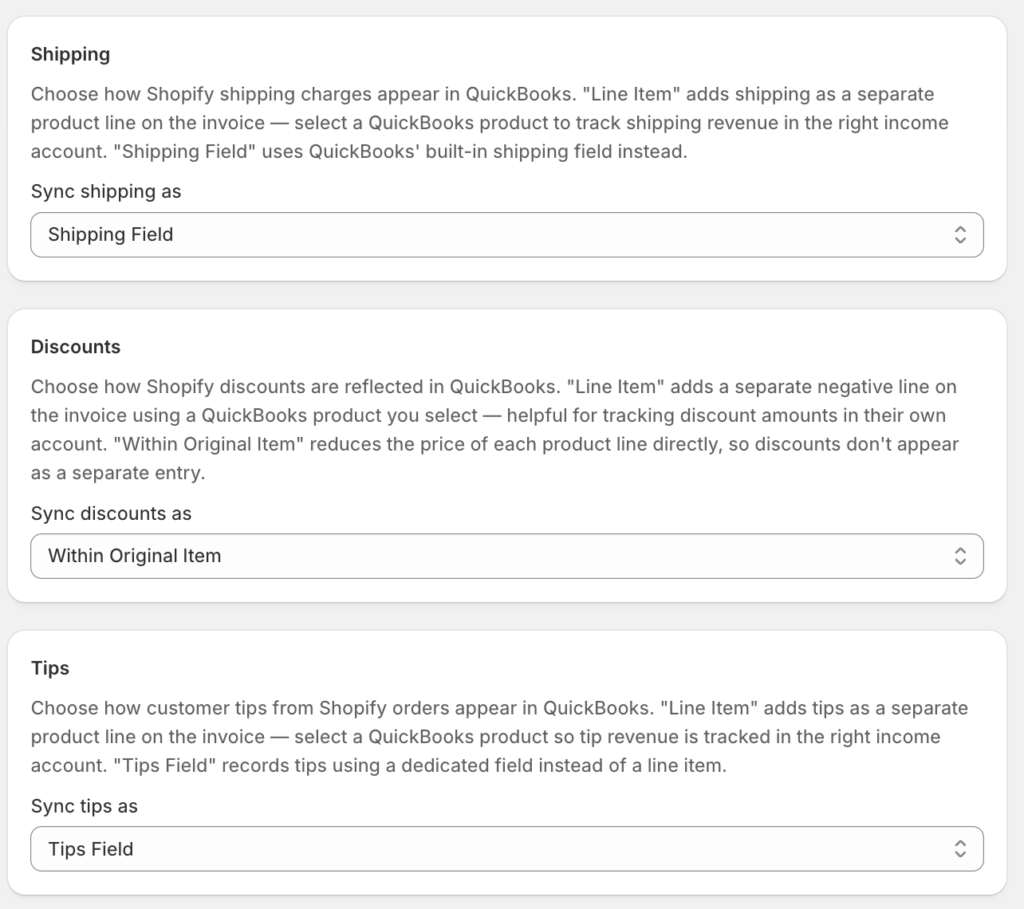
高度なセクションでは、4 つの特定の注文コンポーネント(配送料、割引、チップ、および顧客向け請求書表示)が QuickBooks に記録される方法を制御します。これらの設定は、同期されるすべての注文に適用され、最初の同期の前に確認する必要があります。
配送料
Shopify は、各注文で配送料を個別の金額として請求します。LedgerPort が QuickBooks に配送料を記録する方法については、2 つのオプションがあります。
- 品目 : 請求書または売上票に、選択したQuickBooksの商品を使用して、配送料が個別の品目として追加されます。レポートで配送料の収益または費用を個別の品目として追跡したい場合に選択します。選択すると、配送料用のQuickBooks商品ドロップダウンが表示されるので、配送料を表す商品(通常はサービス品目)を選択します。
- 配送料フィールド : 配送料は、請求書上のQuickBooksのネイティブ配送料フィールドに記録されます。請求書のレイアウトをシンプルにし、配送料が請求書の品目ではなく、税金と共に下部に表示されるようにしたい場合に選択します。
割引
Shopifyの割引額は、QuickBooksのどこかに記録する必要があります。選択肢は次のとおりです。
- 品目 : 割引は、請求書にマイナスの品目として追加されます。これにより、割引がQBOレポートで表示され、個別に追跡可能になります。選択すると、割引用のQuickBooks商品ドロップダウンが表示されます。
- 元の品目内 : 割引は元の品目価格に吸収され、個別の品目を追加するのではなく、品目金額が減少します。これにより請求書はすっきりしますが、総割引額のレポート作成が難しくなります。
チップ
ShopifyストアまたはPOSでチップを受け付ける場合、2つの選択肢があります。
- 品目 : チップは、請求書に個別のプラスの品目として追加されます。表示されるドロップダウンで、チップ用のQuickBooks商品を選択します。
- チップフィールド : チップは、トランザクション上のQuickBooksのネイティブチップフィールドに記録されます。
ストアフロント連携
ストアフロント連携は、QuickBooksの請求書をShopifyの顧客アカウントに接続し、顧客がShopifyストアの顧客ポータルから直接未払い請求書を表示および支払いできるようにします。これはオプションであり、顧客がShopifyアカウントにログインし、請求書を発行する場合(B2Bおよび卸売店で一般的)にのみ役立ちます。
ストアフロント連携を有効にするには:
- QuickBooks請求書を顧客アカウントに表示するにチェックを入れます。
- 表示するトランザクションドロップダウンで、顧客が表示できるトランザクションの種類を選択します:請求書、売上票、または両方。
- オプションで、支払い状況を表示にチェックを入れて、各請求書が支払い済み、一部支払い済み、または未払いかを表示します。
- オプションで、今すぐ支払うボタンを有効にするにチェックを入れて、表示される各請求書に支払いリンクを追加します。有効にすると、支払いリンクプロバイダーを選択します。現在、QuickBooksが利用可能で、QuickBooksのネイティブ支払いポータルリンクを使用します。
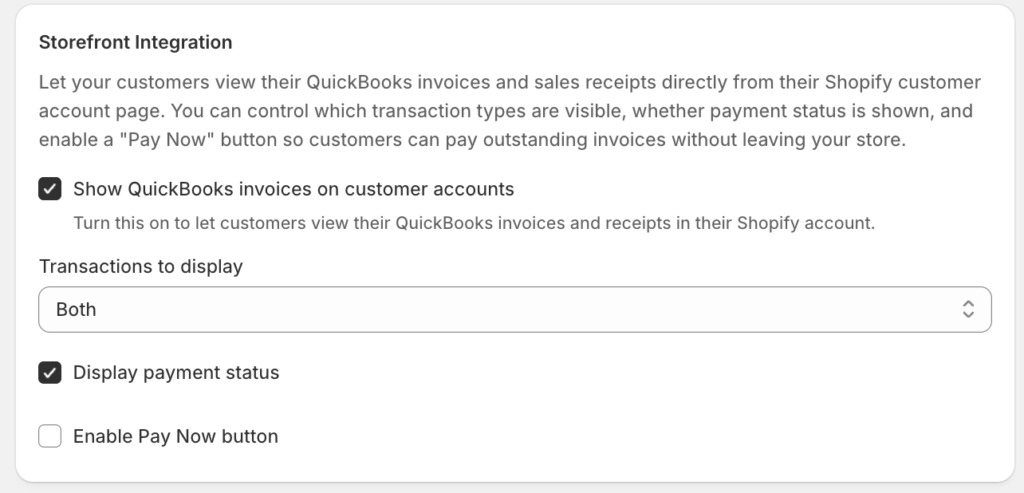
注意:ストアフロント連携には、Shopifyテーマが顧客アカウントページをサポートしている必要があります。顧客がストアのアカウントセクションにアクセスできない場合、この設定が有効になっていても請求書は表示されません。
よくある質問
これらの設定をすべて同期開始前に設定する必要がありますか? いいえ。税金の設定と詳細オプション(配送、割引、チップ)は、最初の同期前に確認する価値があります。これらはすべての注文の記録方法に影響するためです。チャネル、場所、顧客セグメント、注文タグのマッピング機能はオプションであり、いつでも追加できます。これらは、マッピングが保存された後に同期された注文にのみ適用されます。
チャネルまたは場所がドロップダウンに表示されません。何を確認すればよいですか? LedgerPort はこれらのリストを Shopify アカウントから直接取得します。チャネルまたは場所が Shopify 管理画面でアクティブであることを確認してください。最近追加された場合は、現在の同期設定を保存して、会計タブを再度開いて、新しい検索をトリガーしてみてください。
1つの注文が複数のマッピングルールに同時に一致することはありますか? 注文は、1つのチャネルマッピングルール、1つの場所マッピングルール、1つの顧客セグメントマッピングルール、および1つの注文タグマッピングルールに同時に一致し、それぞれが異なるクラスまたは場所を適用できます。複数のルールが同じフィールドを設定しようとする場合(たとえば、2つのルールが両方とも QBO クラスを設定しようとする場合)、最後に一致したルールが優先されます。
どのマッピングルールにも一致しない注文はどうなりますか? 会計タブからのクラス、場所、または銀行口座の分類なしで、通常どおり同期されます。その他の同期設定は引き続き適用されます。
税金を品目として表示を有効にしましたが、税金製品のドロップダウンが空です。 ドロップダウンには、QuickBooks アカウントに既に存在する品目のみが表示されます。QuickBooks で非在庫品目(例:「売上税」)を作成し、ここに返ってきて選択してください。
ストアフロント統合の「今すぐ支払う」ボタンは、有効にした直後に機能しますか? ボタンは、各請求書に対して QuickBooks 支払いリンクを生成します。リンクは QuickBooks の支払いポータルに移動するため、顧客はそこで支払いを完了する必要があります。QuickBooks アカウントで支払い処理が有効になっていない場合、リンクは正しく機能しません。
問題が発生した場合は、ここをクリックしてお問い合わせください。サポートチームがお手伝いします。