
Вкладка «Учет» в разделе «Настройка синхронизации» LedgerPort доступна только для подключений Shopify. Она содержит настройки, которые не применяются к WooCommerce и которые большинству продавцов Shopify потребуется проверить хотя бы один раз во время настройки: как налоги передаются в QuickBooks, как обрабатывать разницу в округлении и дополнительные правила классификации, которые позволяют направлять выручку из различных каналов Shopify, местоположений, групп клиентов или тегов заказов в отдельные счета, классы или местоположения QuickBooks.
Большинству продавцов потребуются только разделы «Настройки налогов» и «Дополнительно». Четыре функции сопоставления — «Канал», «Местоположение», «Сегмент клиента» и «Тег заказа» — предназначены для бизнесов, которые хотят, чтобы QuickBooks отражал их операционную структуру (розница против оптовой торговли, магазин А против магазина Б, онлайн против POS) без необходимости ручной переклассификации внутри QBO после факта.
Перейдите в раздел LedgerPort » Настройка синхронизации и нажмите вкладку Учет. Эта вкладка появляется только при активном подключении магазина Shopify.

После внесения изменений на вкладке «Учет» внизу экрана появится плавающая панель Сохранить. Нажмите Сохранить изменения, чтобы применить.
Настройки налогов
По умолчанию QuickBooks применяет собственные налоговые ставки к счетам-фактурам, что вызывает проблему при синхронизации из Shopify: Shopify уже рассчитал и собрал точный налог с клиента, и если QuickBooks пересчитает его сверху, возникнет несоответствие. Опция Показывать налоги как отдельные позиции решает эту проблему, передавая предварительно рассчитанную сумму налога Shopify как отдельную позицию в счете-фактуре QBO и помечая каждую другую позицию как не облагаемую налогом, чтобы QuickBooks не применял дополнительный налог сверху.
Чтобы включить отдельные позиции для налогов:
- Вы можете выбрать Показывать налоги как отдельные позиции.
- В поле Налоговый продукт выберите элемент продукта или услуги QuickBooks, который вы хотите использовать для представления налоговой позиции. Обычно это товар неинвентарного учета, названный примерно «Налог с продаж», который вы заранее настроили в QuickBooks.
- При желании введите Описание налога, чтобы настроить метку, которая отображается в строке счета (например, «Налог с продаж Shopify»).
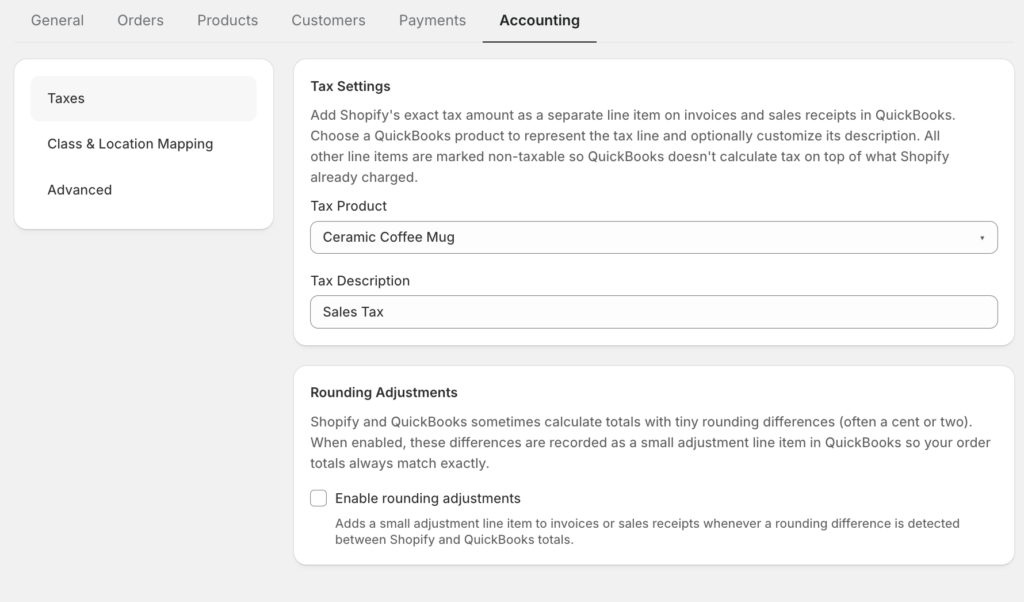
Примечание: Налоговый продукт должен существовать в вашей учетной записи QuickBooks, прежде чем он появится в раскрывающемся списке. Если список пуст, сначала создайте элемент в QuickBooks, а затем вернитесь сюда.
Корректировки округления
Даже когда налоги синхронизируются правильно, дробное округление может привести к незначительным расхождениям между общей суммой заказа Shopify и суммой позиций в QuickBooks, обычно на несколько центов. Если эти расхождения не устранить, в счетах будет отображаться непогашенный остаток, не соответствующий реальному платежу, что может привести к ложным расхождениям платежей в вашей бухгалтерии.
Включение корректировок округления указывает LedgerPort размещать любой остаток на выделенном продукте QuickBooks, чтобы общая сумма счета была точно сбалансирована.
Чтобы включить корректировки округления:
- Вы можете установить флажок Включить корректировки округления.
- Выберите Продукт округления из выпадающего списка — это элемент QuickBooks, который вы создали специально для поглощения разниц в округлении (обычно называется «Корректировка округления» или аналогично). Суммы, размещенные здесь, обычно составляют менее 0,01 доллара за заказ.
Примечание: Эта настройка влияет только на счета или квитанции о продажах, созданные LedgerPort в дальнейшем. Она не корректирует ретроактивно уже синхронизированные записи.
Сопоставление каналов
Shopify продает через несколько каналов — ваш интернет-магазин, Shopify POS, Instagram, Facebook и так далее. По умолчанию LedgerPort размещает все доходы каналов на одних и тех же счетах QuickBooks. Если вы хотите видеть разбивку по каналам в QuickBooks (например, чтобы сравнить доходы от POS и онлайн-доходы), сопоставление каналов позволяет назначить каждый канал Shopify определенному банковскому счету, классу или местоположению QuickBooks, чтобы эта классификация применялась автоматически при синхронизации заказов.
Чтобы настроить сопоставление каналов:
- Вы можете установить флажок Включить сопоставление каналов.
- В строке ввода, которая появится, выберите канал Shopify из первого выпадающего списка; список содержит каналы, в настоящее время опубликованные в вашем магазине Shopify.
- Назначьте класс QuickBooks, местоположение QuickBooks или банковский счет QuickBooks (вы можете установить один, два или все три).
- Нажмите Добавить. Сопоставление появится в таблице ниже.
- Повторите для каждого канала, который вы хотите классифицировать отдельно.
Чтобы удалить сопоставление, нажмите значок корзины в этой строке.
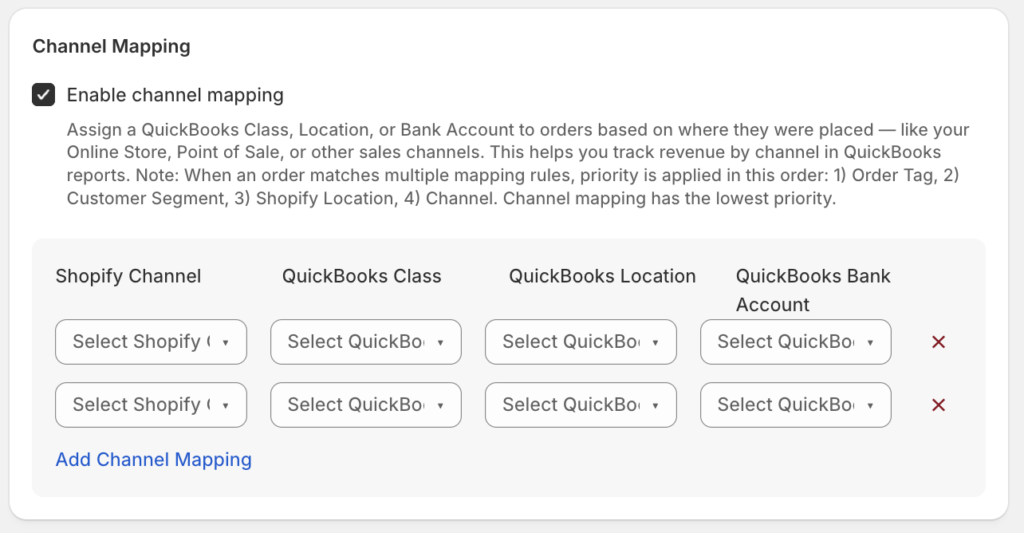
Примечание: Вы должны выбрать канал Shopify и как минимум одно назначение QuickBooks, прежде чем кнопка Добавить станет активной.
Сопоставление местоположений Shopify
Если ваш магазин Shopify работает из нескольких физических мест — отдельных складов, розничных магазинов или центров выполнения заказов — Shopify связывает каждый заказ с местом, которое его выполняет. По умолчанию эти различия в местоположении невидимы в QuickBooks. Сопоставление местоположений позволяет перенести эту информацию, назначая каждое местоположение Shopify местоположению или классу QuickBooks, чтобы вы могли запускать отчеты на уровне местоположений в QBO без ручного перекодирования записей.
Чтобы настроить сопоставление местоположений:
- Установите флажок Включить сопоставление местоположений Shopify.
- В строке ввода выберите местоположение Shopify из первого выпадающего списка; список отражает активные местоположения в вашей учетной записи Shopify.
- Назначьте Местоположение QuickBooks, Класс QuickBooks или оба варианта.
- Нажмите Добавить. Сопоставление появится в таблице ниже.
- Повторите для каждого местоположения Shopify, которое вы хотите отслеживать отдельно.
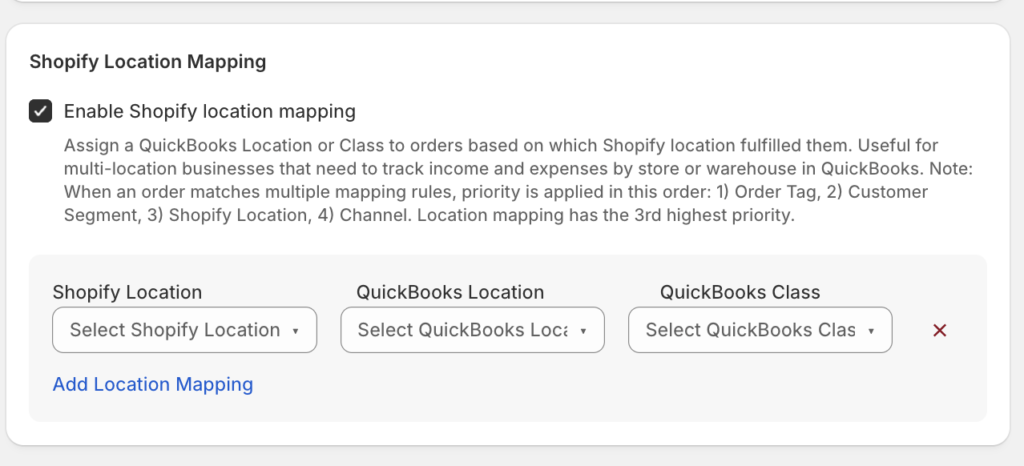
Примечание: Местоположения Shopify берутся из вашей активной учетной записи Shopify. Если местоположение не отображается в раскрывающемся списке, убедитесь, что оно активно в разделе Shopify Admin » Locations.
Сопоставление сегментов клиентов
Shopify позволяет создавать сегменты клиентов — сохраненные группы на основе критериев, таких как история покупок, теги, география или тип клиента (например, оптовый или розничный). Если эти сегменты имеют значение для вашей бухгалтерии, сопоставление сегментов клиентов переносит эту классификацию в QuickBooks, автоматически назначая Класс QBO или Местоположение заказам из каждого сегмента.
Это особенно полезно для B2B-продавцов, которые хотят отдельно отслеживать оптовые и розничные доходы в QuickBooks, или для компаний с уровнями лояльности, которые хотят отчитываться по каждому уровню независимо, не помечая вручную каждый счет-фактуру в QBO.
Чтобы настроить сопоставление сегментов клиентов:
- Установите флажок Включить сопоставление сегментов клиентов.
- Выберите Сегмент клиента из первого раскрывающегося списка.
- Назначьте Класс QuickBooks, Местоположение QuickBooks или оба варианта.
- Нажмите Добавить.
- Повторите для каждого сегмента, который вы хотите классифицировать.
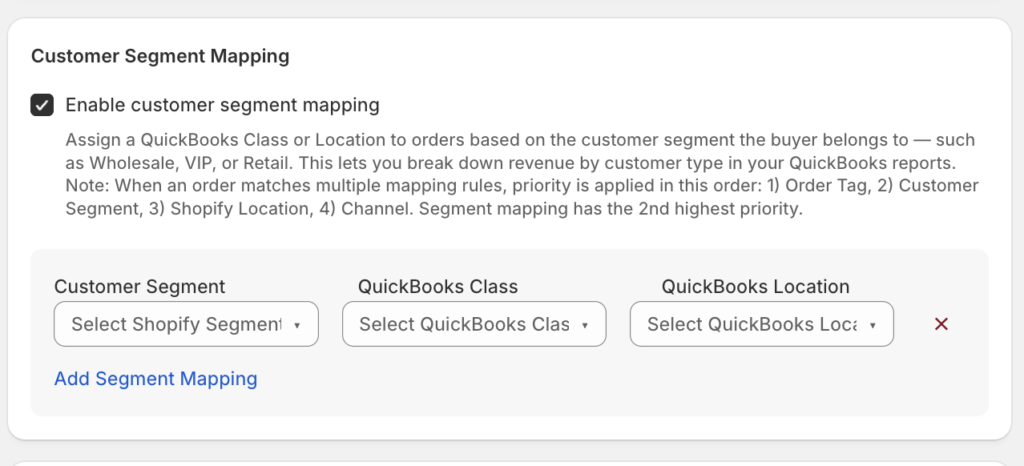
Примечание: Сегменты клиентов берутся из вашей учетной записи Shopify. Сегменты должны существовать в Shopify, прежде чем они появятся в раскрывающемся списке здесь.
Сопоставление тегов заказов
Теги заказов — это метки, которые вы или ваши автоматизации прикрепляете к заказам Shopify — например, для обозначения промо-заказов, покупок подарочных карт, B2B-заказов или любой другой определенной вами группы. Сопоставление тегов заказов преобразует эти теги в классификацию QuickBooks, автоматически назначая Класс QBO или Местоположение любому заказу, который несет определенный тег.
Например: если ваша команда помечает все заказы, размещенные через партнерскую реферальную программу, тегом вроде «partner-referral», вы можете сопоставить этот тег с выделенным классом QuickBooks для отслеживания доходов от партнеров без какой-либо ручной работы в QBO.
Чтобы настроить сопоставление тегов заказов:
- Установите флажок Включить сопоставление тегов заказов.
- В строке ввода введите точный текст тега заказа Shopify в поле Тег заказа. Теги чувствительны к регистру — вводите их точно так, как они отображаются в Shopify.
- Назначьте Класс QuickBooks, Местоположение QuickBooks или оба варианта.
- Нажмите Добавить.
- Повторите для каждого тега, который вы хотите маршрутизировать.
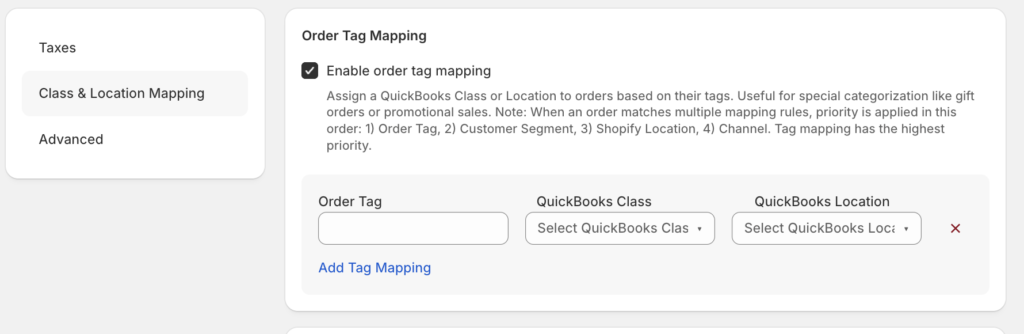
Примечание: Сопоставление тегов заказов работает на основе точного совпадения текста. Если заказ содержит несколько тегов, LedgerPort применит сопоставление для первого тега в списке, для которого настроено правило.
Расширенные настройки
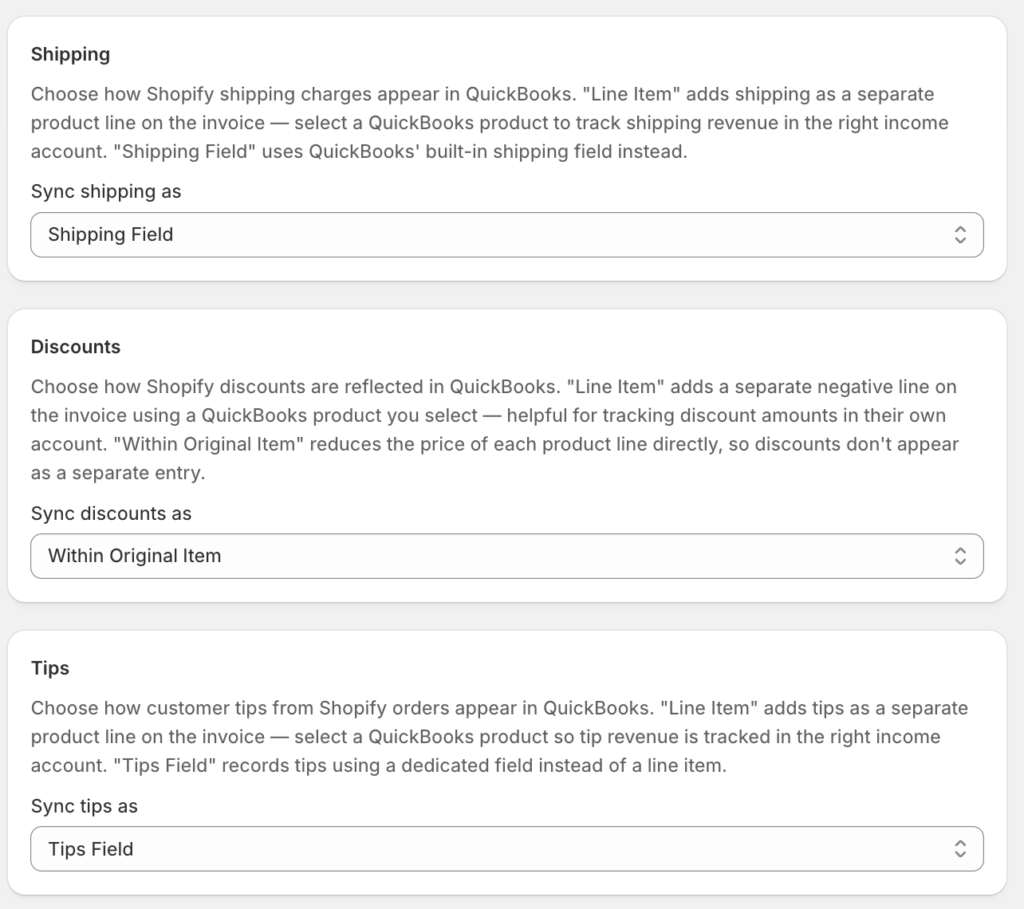
Раздел «Расширенные настройки» контролирует, как четыре конкретных компонента заказа — доставка, скидки, чаевые и отображение счета для клиента — записываются в QuickBooks. Эти настройки применяются ко всем синхронизированным заказам и должны быть проверены перед первой синхронизацией.
Доставка
Shopify взимает плату за доставку как отдельную сумму для каждого заказа. У вас есть два варианта того, как LedgerPort будет записывать ее в QuickBooks:
- Позиция : Доставка добавляется как отдельная позиция в счете-фактуре или квитанции о продаже QBO, используя выбранный вами продукт QuickBooks. Выберите этот вариант, если вы хотите отслеживать доходы или расходы на доставку как отдельную позицию в ваших отчетах. При выборе появляется выпадающий список Продукт QuickBooks для доставки, выберите продукт (обычно услугу), который представляет доставку.
- Поле «Доставка» : Доставка записывается в стандартное поле суммы доставки QuickBooks в счете-фактуре. Выберите этот вариант для более простого макета счета-фактуры, где сумма доставки отображается внизу рядом с налогом, а не как отдельная позиция счета-фактуры.
Скидки
Суммы скидок Shopify должны быть где-то записаны в QuickBooks. Ваши варианты:
- Позиция : Скидка добавляется как отрицательная позиция в счете-фактуре. Это делает скидку видимой и отдельно отслеживаемой в отчетах QBO. При выборе появляется выпадающий список Продукт QuickBooks для скидок.
- В рамках исходного товара : Скидка поглощается ценой исходного товара, уменьшая сумму позиции, а не добавляя отдельную позицию. Это создает более чистый счет-фактуру, но затрудняет составление отчетов об общих предоставленных скидках.
Чаевые
Если ваш магазин Shopify или POS принимает чаевые, у вас есть два варианта:
- Позиция : Чаевые добавляются как отдельная положительная позиция в счете-фактуре. Выберите Продукт QuickBooks для чаевых в появившемся выпадающем списке.
- Поле «Чаевые» : Чаевые записываются в стандартное поле чаевых QuickBooks в транзакции.
Интеграция с витриной магазина
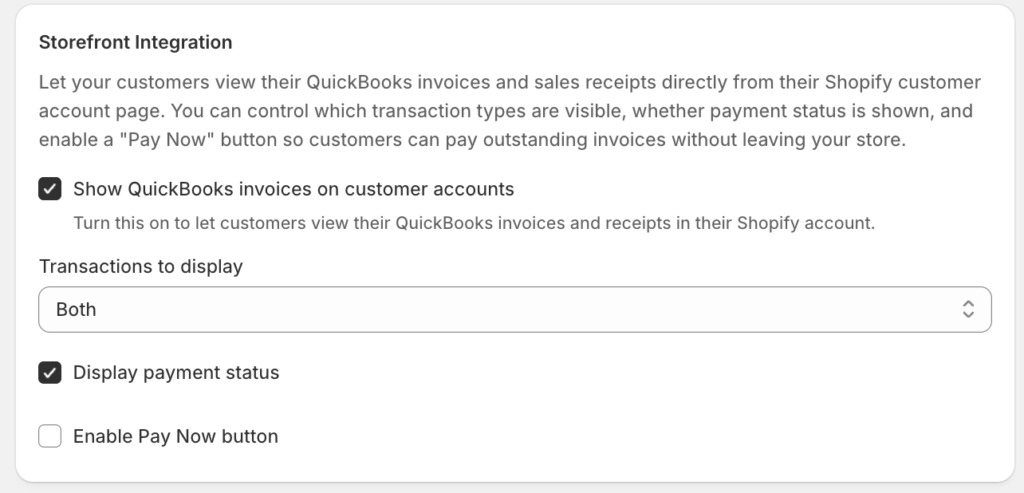
Интеграция с витриной магазина связывает ваши счета-фактуры QuickBooks с учетными записями клиентов Shopify, позволяя клиентам просматривать и оплачивать свои неоплаченные счета непосредственно из клиентского портала вашего магазина Shopify. Это необязательно и полезно только в том случае, если ваши клиенты входят в свои учетные записи Shopify, а вы выставляете счета (обычно в B2B и оптовых магазинах).
Чтобы включить интеграцию с витриной магазина:
- Установите флажок Показывать счета QuickBooks в учетных записях клиентов.
- В выпадающем списке Транзакции для отображения выберите, какие типы транзакций клиенты могут видеть: Счет-фактура, Квитанция о продаже или Оба.
- При желании установите флажок Отображать статус оплаты, чтобы показать, был ли каждый счет-фактура оплачен, частично оплачен или находится на рассмотрении.
- При желании установите флажок Включить кнопку «Оплатить сейчас», чтобы добавить ссылку для оплаты на каждый отображаемый счет-фактуру. При включении выберите Поставщик ссылки для оплаты, в настоящее время доступен QuickBooks, который использует стандартную ссылку портала оплаты QuickBooks.
Примечание: Интеграция с витриной магазина требует, чтобы ваша тема Shopify поддерживала страницы учетных записей клиентов. Если клиенты не могут получить доступ к разделу учетных записей вашего магазина, счета-фактуры не будут видны, даже если эта настройка включена.
Часто задаваемые вопросы
Нужно ли настраивать все эти параметры перед началом синхронизации? Нет. Настройки налогов и дополнительные параметры (доставка, скидки, чаевые) стоит просмотреть перед первой синхронизацией, поскольку они влияют на то, как будет записываться каждый заказ. Функции сопоставления — канал, местоположение, сегмент клиента и тег заказа — являются необязательными и могут быть добавлены в любое время. Они применяются только к заказам, синхронизированным после сохранения сопоставления.
Мой канал или местоположение не отображаются в раскрывающемся списке. Что мне следует проверить? LedgerPort получает эти списки непосредственно из вашей учетной записи Shopify. Убедитесь, что канал или местоположение активны в Shopify Admin. Если они были добавлены недавно, попробуйте сохранить текущие настройки Sync Config и снова открыть вкладку «Учет» (Accounting), чтобы инициировать новый поиск.
Может ли один заказ соответствовать нескольким правилам сопоставления одновременно? Заказ может одновременно соответствовать одному правилу сопоставления каналов, одному правилу сопоставления местоположений, одному правилу сопоставления сегментов клиентов и одному правилу сопоставления тегов заказов, и каждое из них может применять другой класс или местоположение. Если несколько правил назначают одно и то же поле (например, два правила пытаются установить класс QBO), последнее соответствующее правило имеет приоритет.
Что происходит с заказами, которые не соответствуют ни одному правилу сопоставления? Они синхронизируются нормально без какого-либо класса, местоположения или классификации банковского счета из вкладки «Учет» (Accounting). Другие ваши настройки Sync Config по-прежнему применяются.
Я включил «Показывать налоги как отдельные позиции», но мой раскрывающийся список «Налоговый продукт» пуст. В раскрывающемся списке отображаются только элементы, которые уже существуют в вашей учетной записи QuickBooks. Создайте в QuickBooks товар, не подлежащий инвентаризации (например, «Налог с продаж»), и вернитесь сюда, чтобы выбрать его.
Работает ли кнопка «Оплатить сейчас» в интеграции с витриной магазина сразу после ее включения? Кнопка генерирует ссылку на оплату QuickBooks для каждого счета. Ссылка ведет на портал оплаты QuickBooks, поэтому клиенты должны завершить оплату там. Если в вашей учетной записи QuickBooks не включена обработка платежей, ссылка не будет работать должным образом.
Если у вас возникнут какие-либо проблемы, пожалуйста, свяжитесь с нами, нажав здесь. Наша служба поддержки сможет вам помочь.