
Der Tab "Buchhaltung" in der LedgerPort-Sync-Konfiguration ist ausschließlich für Shopify-Verbindungen bestimmt. Er umfasst Einstellungen, die nicht für WooCommerce gelten und die die meisten Shopify-Händler mindestens einmal während der Einrichtung überprüfen müssen: wie Steuern an QuickBooks übertragen werden, wie Rundungsdifferenzen behandelt werden und optionale Klassifizierungsregeln, mit denen Sie Einnahmen aus verschiedenen Shopify-Kanälen, Standorten, Kundengruppen oder Bestell-Tags in separate QuickBooks-Konten, -Klassen oder -Standorte leiten können.
Die meisten Händler benötigen nur die Abschnitte "Steuereinstellungen" und "Erweitert". Die vier Zuordnungsfunktionen – Kanal, Standort, Kundensegment und Bestell-Tag – sind für Unternehmen gedacht, die möchten, dass QuickBooks ihre operative Struktur (Einzelhandel vs. Großhandel, Geschäft A vs. Geschäft B, Online vs. POS) widerspiegelt, ohne dass nach der Tatsache eine manuelle Neuklassifizierung in QBO erforderlich ist.
Gehen Sie zu LedgerPort » Sync Config und klicken Sie auf den Tab Accounting. Dieser Tab wird nur angezeigt, wenn die aktive Verbindung ein Shopify-Store ist.

Nachdem Sie Änderungen im Tab "Buchhaltung" vorgenommen haben, erscheint am unteren Bildschirmrand eine schwebende Save Bar. Klicken Sie auf Save changes, um die Änderungen zu übernehmen.
Steuereinstellungen
Standardmäßig wendet QuickBooks seine eigenen Steuersätze auf Rechnungen an, was beim Synchronisieren von Shopify zu einem Problem führt: Shopify hat die genaue Steuer vom Kunden bereits berechnet und eingezogen, und wenn QuickBooks diese zusätzlich neu berechnet, entsteht eine Diskrepanz. Die Option Show taxes as line items löst dieses Problem, indem sie den von Shopify vorab berechneten Steuerbetrag als eigenen Posten auf der QBO-Rechnung überträgt und jeden anderen Posten als nicht steuerpflichtig kennzeichnet, sodass QuickBooks keine zusätzliche Steuer erhebt.
So aktivieren Sie Steuerposten:
- Sie können Show taxes as line items aktivieren.
- Wählen Sie im Feld Tax Product den QuickBooks-Produkt- oder Dienstleistungsartikel aus, den Sie zur Darstellung des Steuerpostens verwenden möchten. Dies ist in der Regel ein Artikel ohne Lagerbestand mit einem Namen wie „Umsatzsteuer“, den Sie im Voraus in QuickBooks eingerichtet haben.
- Geben Sie optional eine Tax Description ein, um die Bezeichnung anzupassen, die auf dem Rechnungs-Posten erscheint (z. B. „Shopify Sales Tax“).
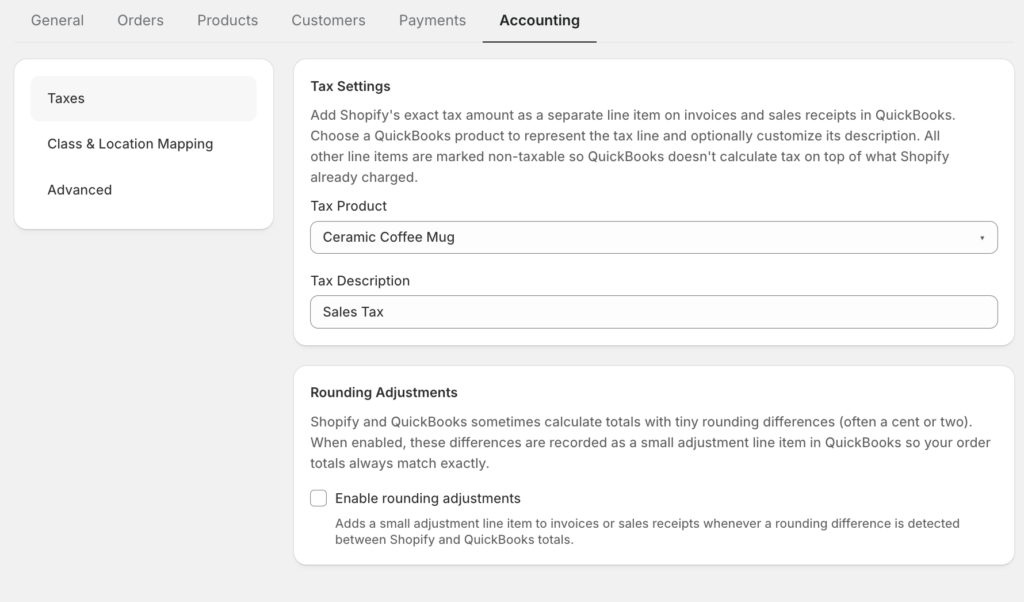
Hinweis: Das Steuerprodukt muss in Ihrem QuickBooks-Konto vorhanden sein, bevor es in der Dropdown-Liste angezeigt wird. Wenn die Liste leer ist, erstellen Sie den Artikel zuerst in QuickBooks und kehren Sie dann hierher zurück.
Rundungsanpassungen
Selbst wenn Steuern korrekt synchronisiert werden, können Rundungsdifferenzen zu geringfügigen Abweichungen zwischen dem Shopify-Bestellwert und der Summe der einzelnen Posten in QuickBooks führen, typischerweise einige Cent. Wenn diese Abweichungen nicht behoben werden, zeigen Rechnungen einen offenen Saldo an, der nicht der tatsächlichen Zahlung entspricht, was zu falschen Zahlungsabgleichen in Ihren Büchern führen kann.
Durch die Aktivierung von Rundungsanpassungen weist LedgerPort an, jeden Restbetrag einem speziellen QuickBooks-Produkt zuzuordnen, sodass der Rechnungsbetrag exakt ausgeglichen ist.
So aktivieren Sie Rundungsanpassungen:
- Sie können das Kontrollkästchen mit der Aufschrift Rundungsanpassungen aktivieren aktivieren.
- Wählen Sie ein Rundungsprodukt aus dem Dropdown-Menü – ein von Ihnen erstellter QuickBooks-Artikel, der speziell zur Aufnahme von Rundungsdifferenzen dient (üblicherweise „Rundungsanpassung“ oder ähnlich benannt). Die hier gebuchten Beträge liegen typischerweise unter 0,01 $ pro Bestellung.
Hinweis: Diese Einstellung wirkt sich nur auf Rechnungen oder Verkaufsbelege aus, die von LedgerPort ab sofort erstellt werden. Bereits synchronisierte Datensätze werden nicht rückwirkend angepasst.
Kanalzuordnung
Shopify verkauft über mehrere Kanäle – Ihren Online-Shop, Shopify POS, Instagram, Facebook usw. Standardmäßig bucht LedgerPort alle Kanalumsätze auf dieselben QuickBooks-Konten. Wenn Sie in QuickBooks eine Aufschlüsselung nach Kanälen wünschen (z. B. um POS-Umsätze mit Online-Umsätzen zu vergleichen), können Sie mit der Kanalzuordnung jeden Shopify-Kanal einem bestimmten QuickBooks-Bankkonto, einer Klasse oder einem Standort zuweisen, sodass diese Klassifizierung automatisch beim Synchronisieren von Bestellungen angewendet wird.
So richten Sie die Kanalzuordnung ein:
- Sie können Kanalzuordnung aktivieren aktivieren.
- Wählen Sie in der Eingabezeile ein Shopify-Kanal aus dem ersten Dropdown-Menü. Die Liste zeigt die Kanäle an, die derzeit in Ihrem Shopify-Shop veröffentlicht sind.
- Weisen Sie eine QuickBooks-Klasse, einen QuickBooks-Standort oder ein QuickBooks-Bankkonto zu (Sie können eine, zwei oder alle drei festlegen).
- Klicken Sie auf Hinzufügen. Die Zuordnung wird in der nachstehenden Tabelle angezeigt.
- Wiederholen Sie dies für jeden Kanal, den Sie separat klassifizieren möchten.
Um eine Zuordnung zu entfernen, klicken Sie auf das Papierkorbsymbol in dieser Zeile.
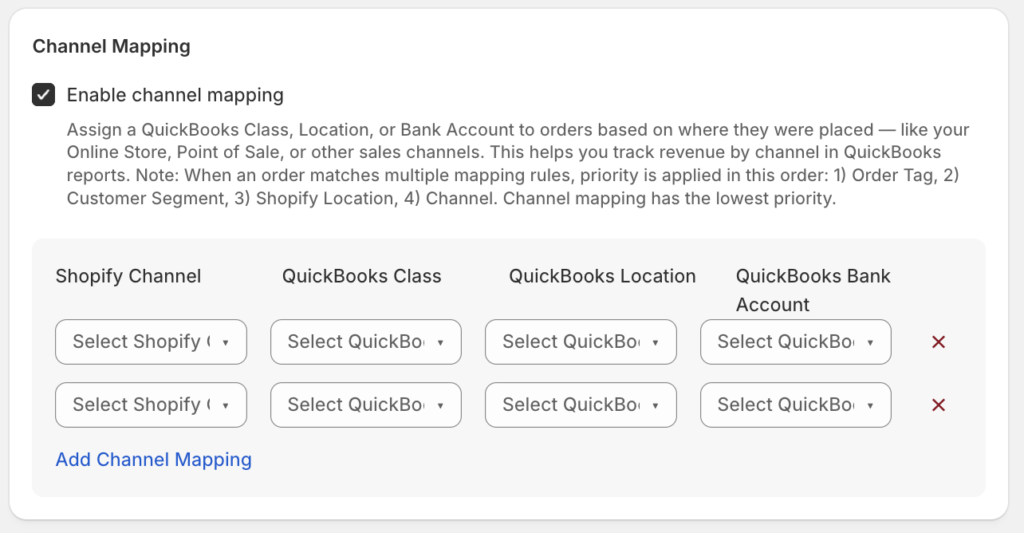
Hinweis: Sie müssen einen Shopify-Kanal und mindestens ein QuickBooks-Ziel auswählen, bevor die Schaltfläche Hinzufügen aktiv wird.
Shopify-Standortzuordnung
Wenn Ihr Shopify-Shop von mehreren physischen Standorten aus betrieben wird – separate Lagerhäuser, Einzelhandelsgeschäfte oder Fulfillment-Center –, ordnet Shopify jede Bestellung dem Standort zu, der sie bearbeitet. Standardmäßig sind diese Standortunterschiede in QuickBooks nicht sichtbar. Die Standortzuordnung ermöglicht es Ihnen, diese Informationen zu übertragen, indem Sie jeden Shopify-Standort einem QuickBooks-Standort oder einer Klasse zuweisen, sodass Sie standortbezogene Berichte in QBO ausführen können, ohne Einträge manuell neu kodieren zu müssen.
So richten Sie die Standortzuordnung ein:
- Aktivieren Sie Shopify-Standortzuordnung aktivieren.
- Wählen Sie in der Eingabezeile einen Shopify-Standort aus dem ersten Dropdown-Menü. Die Liste spiegelt die aktiven Standorte in Ihrem Shopify-Konto wider.
- Weisen Sie einen QuickBooks-Standort, eine QuickBooks-Klasse oder beides zu.
- Klicken Sie auf Hinzufügen. Die Zuordnung wird in der nachstehenden Tabelle angezeigt.
- Wiederholen Sie dies für jeden Shopify-Standort, den Sie separat verfolgen möchten.
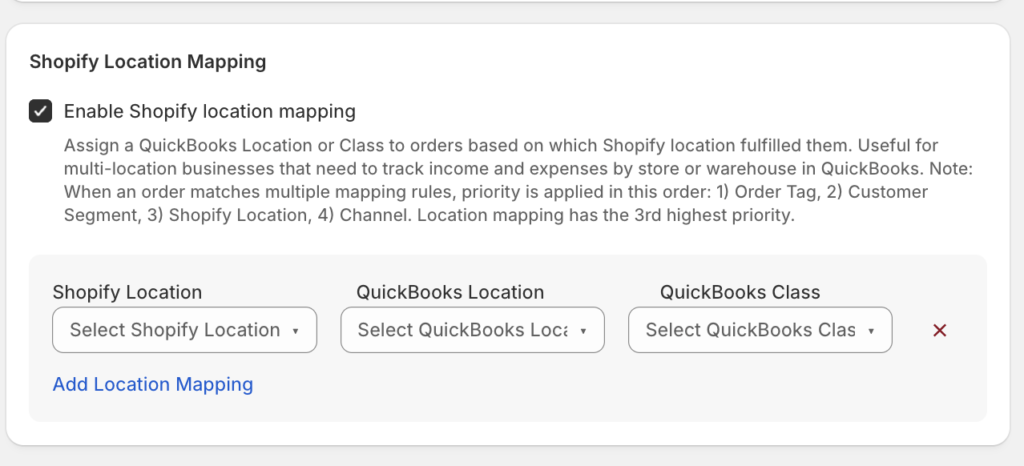
Hinweis: Shopify-Standorte werden aus Ihrem Live-Shopify-Konto abgerufen. Wenn ein Standort nicht im Dropdown-Menü angezeigt wird, stellen Sie sicher, dass er in Shopify Admin » Standorte aktiv ist.
Zuordnungsregeln für Kundensegmente
Shopify ermöglicht es Ihnen, Kundensegmente zu erstellen – gespeicherte Gruppen, die auf Kriterien wie Kaufhistorie, Tags, Geografie oder Kundentyp (z. B. Großhandel vs. Einzelhandel) basieren. Wenn diese Segmente für Ihre Buchhaltung sinnvoll sind, überträgt die Zuordnung von Kundensegmenten diese Klassifizierung in QuickBooks, indem automatisch eine QBO-Klasse oder ein Standort für Bestellungen aus jedem Segment zugewiesen wird.
Dies ist besonders nützlich für B2B-Händler, die Großhandels- und Einzelhandelsumsätze separat in QuickBooks verfolgen möchten, oder für Unternehmen mit Loyalitätsstufen, die über jede Stufe unabhängig berichten möchten, ohne jede Rechnung manuell in QBO zu taggen.
So richten Sie die Zuordnung von Kundensegmenten ein:
- Aktivieren Sie Zuordnung von Kundensegmenten aktivieren.
- Wählen Sie ein Kundensegment aus dem ersten Dropdown-Menü.
- Weisen Sie eine QuickBooks-Klasse, einen QuickBooks-Standort oder beides zu.
- Klicken Sie auf Hinzufügen.
- Wiederholen Sie dies für jedes Segment, das Sie klassifizieren möchten.
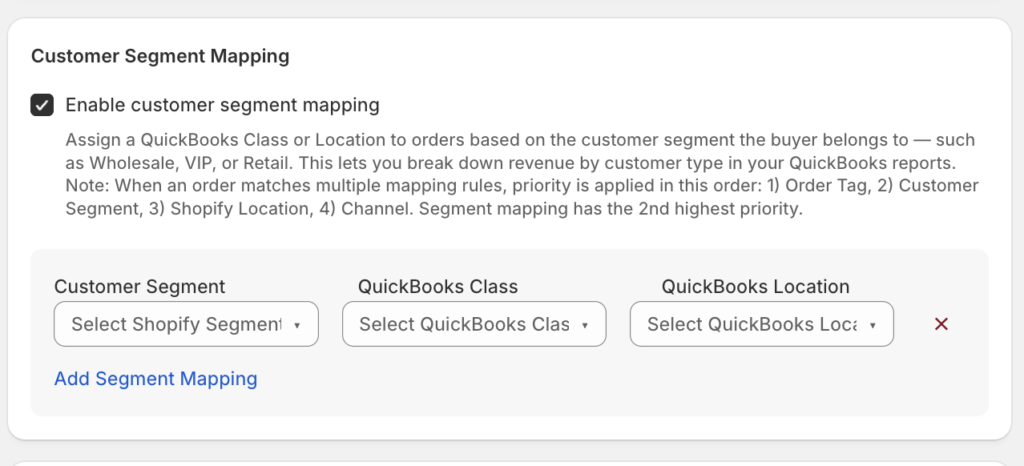
Hinweis: Kundensegmente werden aus Ihrem Shopify-Konto abgerufen. Segmente müssen in Shopify vorhanden sein, bevor sie hier im Dropdown-Menü angezeigt werden.
Zuordnungsregeln für Bestell-Tags
Bestell-Tags sind Bezeichnungen, die Sie oder Ihre Automatisierungen Shopify-Bestellungen zuweisen – zum Beispiel, um Aktionsbestellungen, Geschenkkaufkäufe, B2B-Bestellungen oder jede andere von Ihnen definierte Gruppierung zu kennzeichnen. Die Zuordnung von Bestell-Tags wandelt diese Tags in QuickBooks-Klassifizierungen um, indem automatisch eine QBO-Klasse oder ein Standort für jede Bestellung zugewiesen wird, die einen bestimmten Tag trägt.
Wenn Ihr Team beispielsweise alle Bestellungen, die über ein Partnerempfehlungsprogramm aufgegeben wurden, mit einem Tag wie „partner-referral“ versieht, können Sie diesen Tag einer speziellen QuickBooks-Klasse zuordnen, um Partnerumsätze ohne manuelle Arbeit in QBO zu verfolgen.
So richten Sie die Zuordnung von Bestell-Tags ein:
- Aktivieren Sie Zuordnung von Bestell-Tags aktivieren.
- Geben Sie in der Eingabezeile den exakten Shopify-Bestell-Tag-Text in das Feld Bestell-Tag ein. Tags sind Groß-/Kleinschreibung-sensitiv – geben Sie sie genau so ein, wie sie in Shopify erscheinen.
- Weisen Sie eine QuickBooks-Klasse, einen QuickBooks-Standort oder beides zu.
- Klicken Sie auf Hinzufügen.
- Wiederholen Sie dies für jeden Tag, den Sie weiterleiten möchten.
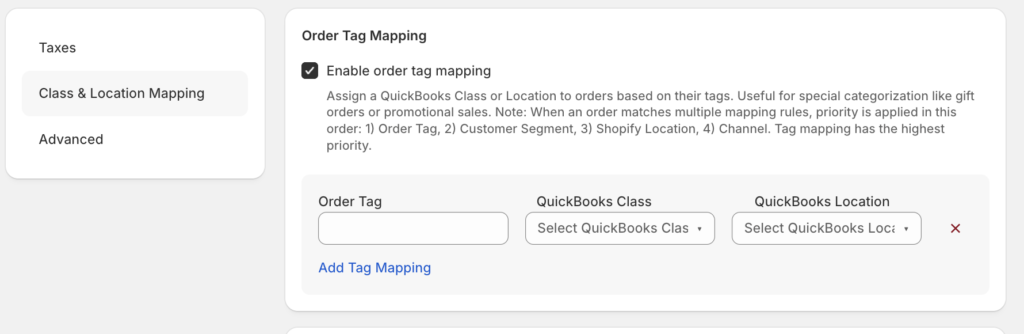
Hinweis: Die Zuordnung von Bestell-Tags funktioniert über exakte Textübereinstimmungen. Wenn eine Bestellung mehrere Tags enthält, wendet LedgerPort die Zuordnung für den ersten Tag in der Liste an, für den eine Regel konfiguriert ist.
Erweiterte Einstellungen
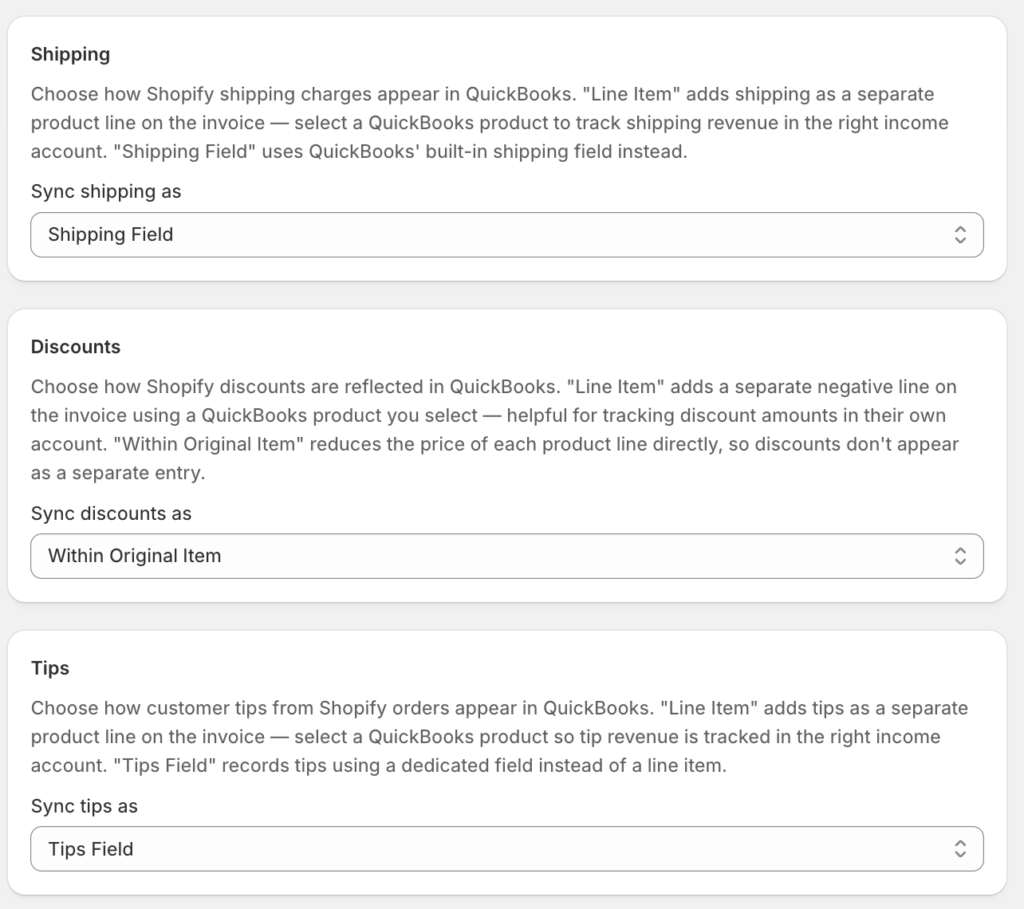
Der Abschnitt „Erweitert“ steuert, wie vier spezifische Bestellkomponenten – Versand, Rabatte, Trinkgelder und kundenbezogene Rechnungsanzeige – in QuickBooks erfasst werden. Diese Einstellungen gelten für jede synchronisierte Bestellung und sollten vor Ihrer ersten Synchronisierung überprüft werden.
Versand
Shopify berechnet den Versand als separaten Betrag für jede Bestellung. Sie haben zwei Möglichkeiten, wie LedgerPort ihn in QuickBooks erfasst:
- Posten : Der Versand wird als separater Posten auf der QBO-Rechnung oder dem Verkaufsbeleg hinzugefügt, wobei ein von Ihnen ausgewählter QuickBooks-Artikel verwendet wird. Wählen Sie diese Option, wenn Sie Versandumsätze oder -kosten als separaten Posten in Ihren Berichten verfolgen möchten. Wenn diese Option ausgewählt ist, wird ein Dropdown-Menü QuickBooks-Artikel für Versand angezeigt. Wählen Sie den Artikel (normalerweise ein Dienstleistungsartikel) aus, der den Versand darstellt.
- Versandfeld : Der Versand wird im nativen Versandbetragsfeld von QuickBooks auf der Rechnung erfasst. Wählen Sie diese Option für ein einfacheres Rechnungsdesign, bei dem der Versandbetrag unten neben der Steuer angezeigt wird und nicht als Rechnungsposten.
Rabatte
Shopify-Rabattbeträge müssen irgendwo in QuickBooks erfasst werden. Ihre Optionen:
- Posten : Der Rabatt wird als negativer Posten auf der Rechnung hinzugefügt. Dadurch wird der Rabatt in QBO-Berichten sichtbar und separat verfolgbar. Wenn diese Option ausgewählt ist, wird ein Dropdown-Menü QuickBooks-Artikel für Rabatte angezeigt.
- Innerhalb des ursprünglichen Artikels : Der Rabatt wird in den ursprünglichen Artikelpreis eingearbeitet, wodurch sich der Postenbetrag verringert, anstatt einen separaten Posten hinzuzufügen. Dies ergibt eine übersichtlichere Rechnung, erschwert jedoch die Berichterstattung über die gewährten Gesamtrabatte.
Trinkgelder
Wenn Ihr Shopify-Store oder POS Trinkgelder akzeptiert, haben Sie zwei Optionen:
- Posten : Trinkgelder werden als separater positiver Posten auf der Rechnung hinzugefügt. Wählen Sie im angezeigten Dropdown-Menü einen QuickBooks-Artikel für Trinkgelder aus.
- Trinkgeldfeld : Trinkgelder werden im nativen Trinkgeldfeld von QuickBooks in der Transaktion erfasst.
Storefront-Integration
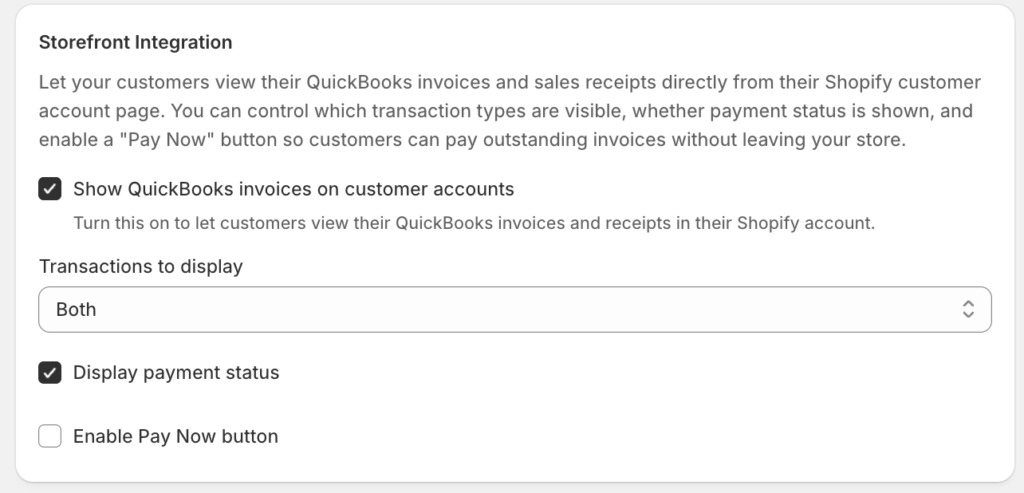
Die Storefront-Integration verbindet Ihre QuickBooks-Rechnungen mit Ihren Shopify-Kundenkonten, sodass Kunden ihre offenen Rechnungen direkt über das Kundenportal Ihres Shopify-Stores einsehen und bezahlen können. Dies ist optional und nur nützlich, wenn sich Ihre Kunden in ihre Shopify-Konten einloggen und Sie Rechnungen ausstellen (häufig in B2B- und Großhandelsgeschäften).
So aktivieren Sie die Storefront-Integration:
- Aktivieren Sie QuickBooks-Rechnungen in Kundenkonten anzeigen.
- Wählen Sie im Dropdown-Menü Anzuzeigende Transaktionen den Transaktionstyp aus, den Kunden sehen können: Rechnung, Verkaufsbeleg oder Beides.
- Aktivieren Sie optional Zahlungsstatus anzeigen, um anzuzeigen, ob jede Rechnung bezahlt, teilweise bezahlt oder offen ist.
- Aktivieren Sie optional Jetzt bezahlen-Schaltfläche aktivieren, um einen Zahlungslink zu jeder angezeigten Rechnung hinzuzufügen. Wenn aktiviert, wählen Sie einen Zahlungslink-Anbieter aus. Derzeit ist QuickBooks verfügbar, der den nativen Zahlungsportal-Link von QuickBooks verwendet.
Hinweis: Die Storefront-Integration erfordert, dass Ihr Shopify-Theme Kundenkontoseiten unterstützt. Wenn Kunden auf den Kontobereich Ihres Shops nicht zugreifen können, sind die Rechnungen nicht sichtbar, auch wenn diese Einstellung aktiviert ist.
Häufig gestellte Fragen
Muss ich all diese Einstellungen konfigurieren, bevor ich mit der Synchronisierung beginne? Nein. Steuereinstellungen und die erweiterten Optionen (Versand, Rabatte, Trinkgelder) sollten vor Ihrer ersten Synchronisierung überprüft werden, da sie beeinflussen, wie jede Bestellung erfasst wird. Die Zuordnungsfunktionen – Kanal, Standort, Kundensegment und Bestell-Tag – sind optional und können jederzeit hinzugefügt werden. Sie gelten nur für Bestellungen, die nach dem Speichern der Zuordnung synchronisiert werden.
Mein Kanal oder Standort wird nicht im Dropdown-Menü angezeigt. Was soll ich überprüfen? LedgerPort ruft diese Listen direkt aus Ihrem Shopify-Konto ab. Bestätigen Sie, dass der Kanal oder Standort in Shopify Admin aktiv ist. Wenn er kürzlich hinzugefügt wurde, versuchen Sie, Ihre aktuellen Sync Config-Einstellungen zu speichern und den Reiter Buchhaltung erneut zu öffnen, um eine neue Abfrage auszulösen.
Kann eine einzelne Bestellung mehreren Zuordnungsregeln gleichzeitig entsprechen? Eine Bestellung kann gleichzeitig einer Kanalzuordnungsregel, einer Standortzuordnungsregel, einer Kundensegmentzuordnungsregel und einer Bestell-Tag-Zuordnungsregel entsprechen, und jede kann eine andere Klasse oder einen anderen Standort zuweisen. Wenn mehrere Regeln dasselbe Feld zuweisen (z. B. zwei Regeln versuchen beide, die QBO-Klasse festzulegen), hat die letzte übereinstimmende Regel Vorrang.
Was passiert mit Bestellungen, die keiner Zuordnungsregel entsprechen? Sie werden normal synchronisiert, ohne Klassifizierung nach Klasse, Standort oder Bankkonto aus dem Reiter Buchhaltung. Ihre anderen Sync Config-Einstellungen gelten weiterhin.
Ich habe Steuern als einzelne Posten anzeigen aktiviert, aber mein Steuereinzelposten-Dropdown ist leer. Das Dropdown zeigt nur Elemente an, die bereits in Ihrem QuickBooks-Konto vorhanden sind. Erstellen Sie einen nicht lagernden Artikel in QuickBooks (z. B. „Umsatzsteuer“) und kehren Sie hierher zurück, um ihn auszuwählen.
Funktioniert der „Jetzt bezahlen“-Button der Storefront-Integration sofort nach der Aktivierung? Der Button generiert für jede Rechnung einen QuickBooks-Zahlungslink. Der Link führt zum Zahlungsportal von QuickBooks, sodass Kunden die Zahlung dort abschließen müssen. Wenn Ihr QuickBooks-Konto keine Zahlungsabwicklung aktiviert hat, funktioniert der Link nicht richtig.
Wenn Sie auf Probleme stoßen, können Sie uns gerne kontaktieren, indem Sie hier klicken. Unser Support-Team wird Ihnen helfen können.