


- 1The Structural Problem Nobody’s E-commerce Accounting Best Practices List Mentions
- 2The Chart of Accounts and Fee Separation Decisions That Actually Matter
- 3Summary Journal Entries and What a Monthly Close Actually Looks Like
- 4Knowing When Manual Breaks — and Automating the Right Thing
- 5The Irony of “E-commerce Accounting Best Practices”
It’s 11 PM on a Sunday. You’ve been staring at a $1,600 discrepancy between your Shopify payout report and your QuickBooks deposit for the last two hours. You’ve re-exported the CSV twice. You’ve checked the date range three times. The bank says $14,200 hit your account this month. Shopify says you sold $15,800. QuickBooks has a third number — $14,740 — and you have no idea where it came from.
So you do what any reasonable person does: you Google “e-commerce accounting best practices.” And you find the same article, published by a dozen different companies, giving you the same advice. Separate your personal and business finances. Use cloud accounting software. Track your cost of goods sold. Reconcile monthly.
You already do all of this. Your books are still wrong. And at some point you start to believe the quiet lie: E-commerce accounting is just inherently messy — close enough is the best you can get.
It’s not. The problem isn’t that you’re ignoring best practices. The problem is that the e-commerce accounting best practices everyone publishes are the wrong ones — or rather, they’re the right ones for a traditional small business, not for a business where the platform that collects your revenue and the software that records it speak fundamentally different languages.
The Structural Problem Nobody’s E-commerce Accounting Best Practices List Mentions
Here’s what’s actually happening with that $1,600 gap. Your Shopify store processed $15,800 in gross sales last month. But Shopify didn’t send you $15,800. Before your money ever touched your bank account, Shopify subtracted $620 in payment processing fees, $480 in refunds across seven returned orders, $340 in Shopify subscription and app charges, and $160 in chargeback adjustments. What arrived in your bank was the net: $14,200.
GROSS SALES
$15,800
What Shopify reports
DEDUCTIONS
−$1,600
Fees, refunds, chargebacks
BANK DEPOSIT
$14,200
What actually arrives
Your accounting software doesn’t know any of this. QuickBooks saw a $14,200 deposit and recorded it. But $14,200 is not your revenue. It’s not your profit. It’s your revenue minus four categories of deductions, flattened into a single number that obscures all of them.
This is the structural problem. E-commerce platforms disburse net payouts. Accounting software expects gross transactions. There is no native translation layer between the two — and until you build one, “e-commerce accounting best practices” are built on a cracked foundation. WooCommerce stores hit the same wall — our WooCommerce accounting guide covers that platform’s version of it.
When someone tells you to “reconcile monthly,” they’re assuming your accounting software already has the right data to reconcile against. It doesn’t. When someone tells you to “track your COGS accurately,” they’re assuming your revenue figures are accurate enough to make the margin calculation meaningful. They aren’t. The advice isn’t wrong. It’s just incomplete. It skips the part that actually matters.
The Chart of Accounts and Fee Separation Decisions That Actually Matter
The first practice that changes everything is one that sounds boring: setting up your chart of accounts correctly. Not the default QuickBooks chart of accounts — the one designed for a business where money moves through a platform before it reaches your bank.
The most important single decision is treating your Shopify Payments balance as a bank account in QuickBooks. Because that’s what it is. Shopify holds your funds, batches them, and disburses them on a schedule — exactly like a bank account. When you create a “Shopify Payout Funds” account in QuickBooks with the type set to Bank and the detail type set to Checking, suddenly the $14,200 deposit stops being a mystery. It becomes a transfer from one account (Shopify) to another (your bank). The gross revenue, the fees, the refunds — they all live inside the Shopify account, where they belong.
The second decision is fee separation. Most store owners record Shopify’s payment processing fees as a single lump expense — if they record them at all. But there are at least three distinct fee categories hiding in every payout: payment processing fees (the per-transaction swipe cost), platform fees (your Shopify subscription, app charges), and refund-related adjustments. Each one belongs in a different expense account because they behave differently, scale differently, and tell you different things about your business.
You also need contra-revenue accounts for discounts and refunds. A refund isn’t an expense — it’s a reduction in revenue. Recording it as an expense inflates both your top-line revenue and your expense totals, making your actual margins invisible. A contra-revenue account for refunds and another for discounts keeps your gross revenue truthful and your net revenue calculable.
Four mapping decisions — Shopify as a bank account, separated fee categories, contra-revenue for refunds, contra-revenue for discounts — take about 30 minutes to set up. They’re the difference between books that reconcile and books that always feel approximately wrong. If you want the complete account mapping for QBO — including the clearing account architecture and sales tax setup — the chart of accounts guide for e-commerce walks through all five decisions.
If these decisions sound abstract, here’s what they look like in a real sync tool: a page of tabs. LedgerPort’s Sync Config screen has seven of them — General, Orders, Products, Customers, Payments, Taxes, Misc — and each one holds a decision from this section. Payment gateways live on the Payments tab, where every gateway detected in your store gets its own clearing account, with a default clearing account as the fallback for anything you haven’t configured. Sales tax lives on the Taxes tab, posting to a QuickBooks liability account you choose. The shape of each order — Sales Receipt or Invoice — is a dropdown on the Orders tab.
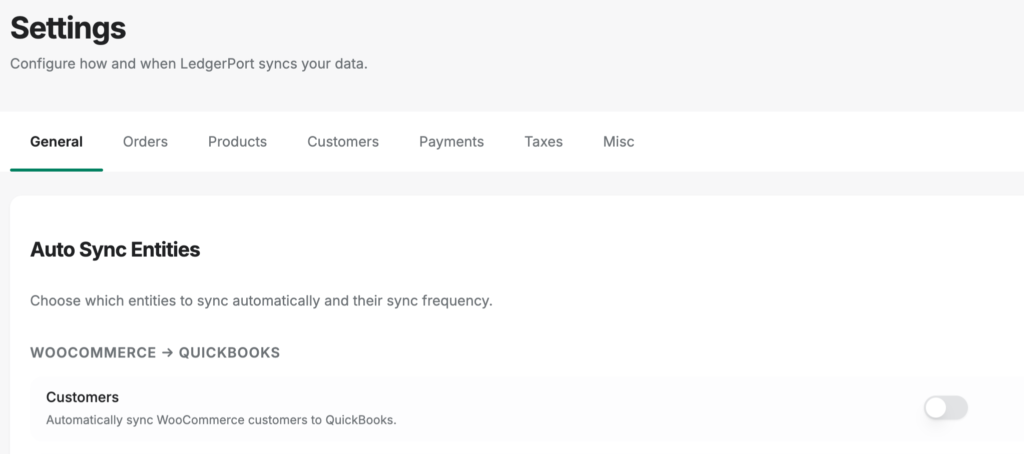
Two properties of that page matter for a best-practices article. First, the docs’ own FAQ says most stores can start syncing without touching Sync Config at all — the defaults are sensible, so the structure isn’t a prerequisite project. Second, configuration changes apply to future syncs only; nothing you’ve already posted gets retroactively rewritten, so adjusting a decision later can’t corrupt closed periods. The practices in this article aren’t aspirational, in other words. They’re the tabs.
Summary Journal Entries and What a Monthly Close Actually Looks Like
Here’s a practice that surprises most store owners: you probably shouldn’t sync every individual transaction from Shopify to QuickBooks.
If you’re doing 500 orders a month, syncing each one means 500 individual entries in QuickBooks — plus their associated fee entries, tax entries, and refund entries. QuickBooks slows down. Reports take forever to generate. Your CPA charges you more because navigating your file takes longer. And the irony is that all that granularity doesn’t make your books more accurate. It makes them harder to use.
The better approach is summarized journal entries — daily or weekly summaries that roll up all transactions for a period into a single entry. One entry captures gross sales, fees, refunds, tax collected, and net payout for the day. Your books stay clean, your reports run fast, and the numbers still match your bank deposits to the penny.
This is the approach most experienced e-commerce accountants recommend, and it’s what tools like LedgerPort generate automatically. But you can do it manually if your volume is low enough. The question is whether “low enough” describes your store — which brings us to the monthly close.
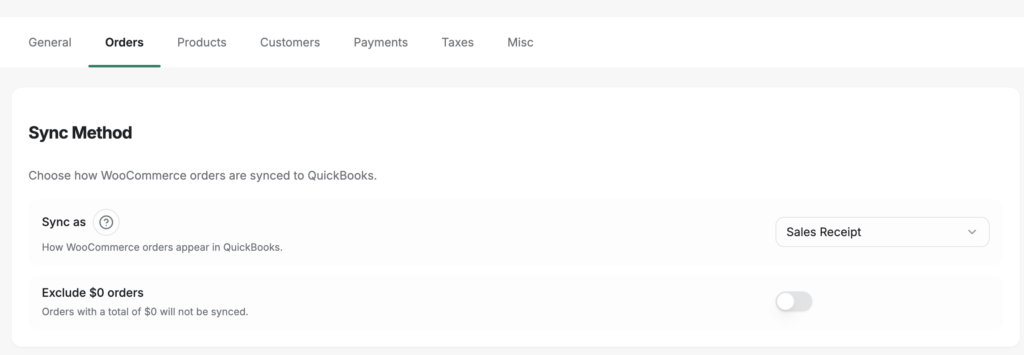
Worth knowing: in modern sync tooling, the summary entry isn’t something you build by hand — it’s a named, selectable mode. LedgerPort calls it Daily Summary: one journal entry per day, aggregating all of that day’s orders, chosen from the same dropdown as the per-order options (Sales Receipt, Invoice) at Sync Config » Orders. The vendor’s own guidance puts the tipping point at roughly 100 or more orders per day; below that, per-order records stay perfectly manageable and give you order-level detail in QuickBooks. Per-order versus summarized isn’t a philosophy you inherit from your tool — it’s a setting you pick.
When articles tell you to “reconcile monthly,” here’s what that should actually look like for an e-commerce store:
- Pull your Shopify payout report for the month. This shows every disbursement and what it contained.
- Match each payout to a deposit in your bank account. Every payout should have a corresponding deposit within 1-3 business days.
- Verify that the gross components (sales, fees, refunds) for each payout are recorded correctly in QuickBooks — either as individual entries or as summarized journal entries.
- Reconcile the Shopify Payout Funds account in QuickBooks to zero (or to the current held balance if Shopify is holding funds in transit).
- Run a profit and loss report and verify that gross revenue, net revenue, and fee totals match your Shopify admin dashboard.
If you’re syncing with a tool, add a step zero before any of that: filter the sync log for errors. Every sync attempt in LedgerPort gets a logged status — Synced, Error, Pending, or On Hold — and filtering the audit log to Status = Error is the fastest pre-reconciliation check that exists. An order that failed to sync in week two is a hole in your gross revenue that step 3 can never verify against; caught now, it’s a fix and a re-sync. Caught during reconciliation, it’s an hour of hunting for a number that was never there. Errors found before the close are journal gaps avoided during it.
MANUAL RECONCILIATION
15+ hrs/mo
At 500+ orders per month
AUTOMATED RECONCILIATION
1–2 hrs/mo
With payout-to-gross translation
If you’re doing this manually at 500+ orders per month, steps 1 through 3 take somewhere between 4 and 8 hours. At 2,000+ orders, the math stops working entirely — you’ll miss entries, transpose numbers, and end each month with a “close enough” reconciliation that drifts further from reality every quarter. Automation tools cut this to under an hour by handling the payout-to-gross translation automatically. The full manual walkthrough — matching each payout, fee, and refund to the deposit — is in our guide to reconciling Shopify payouts in QuickBooks.
Knowing When Manual Breaks — and Automating the Right Thing
Every e-commerce accounting best practices article tells you to automate your accounting. Very few tell you what specifically to automate — or when.
Manual e-commerce bookkeeping has a breakpoint, and it’s lower than most people think. At around 200-300 orders per month, the time cost of manually categorizing transactions, matching payouts, and reconciling fees starts to exceed the cost of an automation tool. At 500+ orders, manual reconciliation is almost certainly your most expensive line item on a per-hour basis — you just don’t see it because the cost is buried in your time, not in an invoice.
Bad reconciliation practices don’t just cost time. They cost revenue. Industry data suggests that poor reconciliation can quietly leak 2-3% of total sales through untracked fees, missed chargebacks, and misclassified refunds. For a store doing $1 million in annual revenue, that’s $20,000-$30,000 in invisible losses — not because the money was stolen, but because the books didn’t catch the discrepancies. That number echoes what we covered in The $7,500 Mistake Most Shopify Store Owners Are Making — the cost of getting this wrong compounds faster than most owners realize.
REVENUE LEAKAGE
2–3%
of total sales lost to poor reconciliation
Untracked fees, missed chargebacks, and misclassified refunds add up to $20,000–$30,000 per year for a $1M store.
But “automate everything” is the wrong advice. The specific automation that matters is the payout-to-gross translation — taking that net $14,200 deposit and breaking it back into its component parts: $15,800 in gross sales, $620 in processing fees, $480 in refunds, $340 in platform charges, $160 in chargeback adjustments. This is the translation that’s tedious, error-prone, and structurally repetitive. It’s the automation that actually moves the needle.
There’s a second test for “the right thing,” and it’s worth applying to any tool you evaluate: does the automation adopt your accounting policy, or impose its own? In LedgerPort, two policies that most tools hard-code are settings on one screen. The first is the sync method — whether orders post as individual Sales Receipts, as Invoices with open receivables, or as Daily Summary journal entries is a choice at Sync Config » Orders, so per-order versus summarized books stays your architecture, just automated. The second is the revenue-recognition point. Sync triggers are a matrix of payment statuses and fulfillment statuses, and an order posts only when both conditions are met — so a B2B store that recognizes revenue at fulfillment and a DTC store that recognizes at payment configure different checkboxes on the same screen, and each gets books that match its policy.
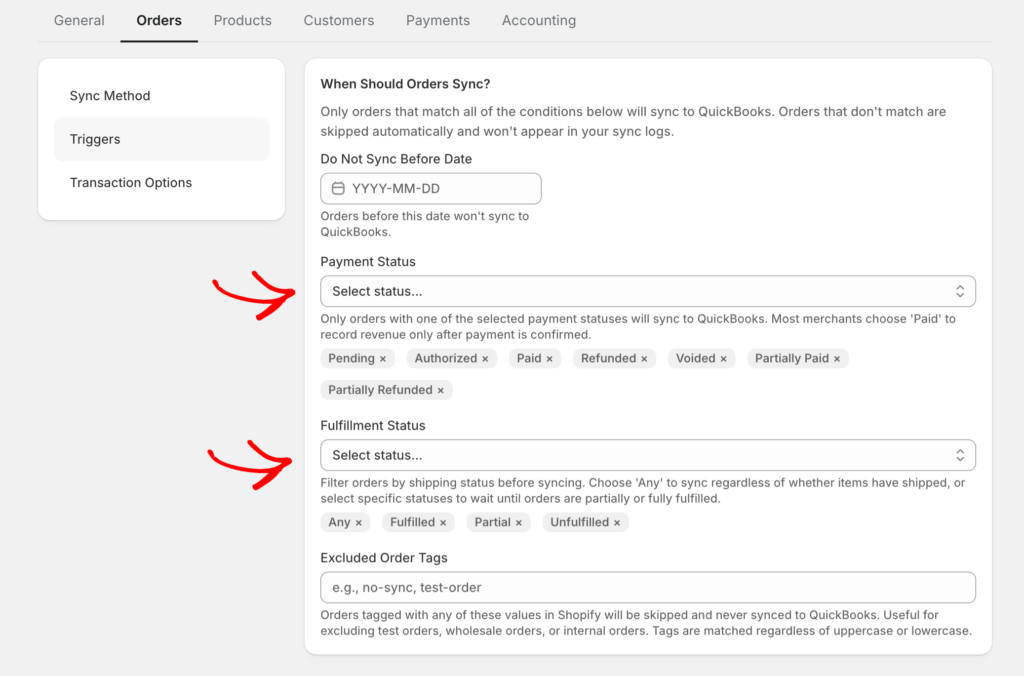
And the honest connection to the earlier sections: none of this works without the structure. Gateway-to-clearing-account mapping lives at Sync Config » Payments, which means the automation posts into the fee-separation architecture you built in the chart of accounts section — it doesn’t replace that work, it operationalizes it. Accounting policy expressed as tool settings: that’s the standard to hold any automation to.
Automating your email marketing or your inventory reordering is useful. Automating the payout-to-gross translation is foundational. Without it, every other financial process in your business is working with incomplete data. You can see exactly how that translation layer works in practice.
The Irony of “E-commerce Accounting Best Practices”
You came to this article looking for a list of things to do. Separate your finances, use QuickBooks, track COGS, reconcile monthly — you’ve seen that list. You may have bookmarked it. You may have checked every item. And your books were still $1,600 off on a Sunday night.
The irony is that the practices that actually prevent e-commerce reconciliation disasters aren’t on anyone’s standard list. They’re structural decisions — how you set up your chart of accounts, how you treat platform payouts, whether you use summary entries or per-transaction sync, and at what point you stop doing the payout translation by hand. These aren’t glamorous. They don’t make good listicle headlines. But they’re the foundation that makes every other e-commerce accounting best practice actually work.
That $1,600 gap wasn’t a mystery. It was $620 in processing fees, $480 in refunds, $340 in platform charges, and $160 in chargeback adjustments — all deducted before the money reached your bank, and none of them recorded anywhere in your accounting software. Once you understand that, fixing it is mechanical. Setting up the translation layer — whether manually with the right chart of accounts or automatically with a tool like LedgerPort — takes less time than one more Sunday night spent staring at numbers that don’t match.
Get started for free and see your first month reconciled automatically.