

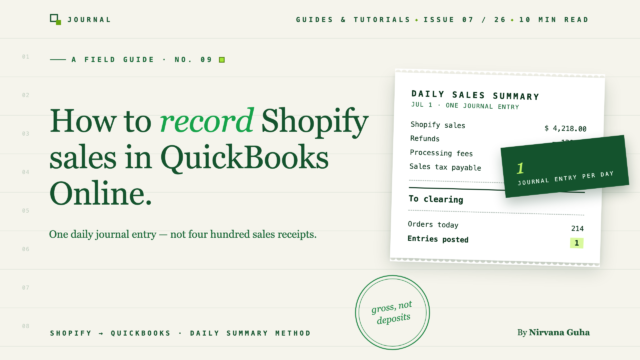
- 1Ang Dalawang Paraan ng Pag-record ng mga Benta sa Shopify na Karaniwang Nagkakamali
- 2Bakit Nasira (at Patuloy na Nasira) ang Pag-sync ng mga Indibidwal na Order
- 3Paano Mag-record ng mga Benta sa Shopify sa QuickBooks Online: Ang Paraan ng Araw-araw na Buod
- 4Hakbang 1 — I-set up ang limang account
- 5Hakbang 2 — Kunin ang mga numero ng isang araw mula sa Shopify
- 6Hakbang 3 — Buuin ang journal entry (halimbawang gumagana)
- 7Hakbang 4 — Itugma ang payout
- 8Hakbang 5 — Ulitin araw-araw, i-verify buwan-buwan
- 9Dapat Mo Bang Gawin Ito Nang Manu-mano o I-automate Ito?
- 10Ano ang Ginagawa ng LedgerPort Gamit ang Estrukturang Ito
- 11Kapag Ang Pag-record ng mga Benta ay Hindi Na Isang Gawain
Ang problema ay hindi ang iyong pagpasok ng data. Ito ang paraan ng pag-record — at may dahilan kung bakit ang mga propesyonal ay gumagamit ng parehong paraan.
Binuksan mo ang iyong Profit & Loss sa QuickBooks Online, at ang bilang ng kita ay halos doble ng iyong alam na naibenta mo. Tinitigan mo ito. Ginawa mo ang lahat ng sinabi ng setup guide. At sinasabi sa iyo ng QuickBooks ngayon, nang may buong kumpiyansa, na ang iyong tindahan ay kumita ng doble ng pera kaysa sa aktwal na kinita nito.
Kung naranasan mo ang sandaling iyon, malamang na napunta ka doon sa isa sa dalawang paraan. Alinman ay ikinonekta mo ang opisyal na QuickBooks Connector (o isang katulad na app) at sinundan ang mga setup screen — at ngayon ang iyong mga deposito sa bank feed at ang iyong mga naka-sync na resibo ng benta ay parehong binibilang bilang kita. O ang sync ay gumana nang eksakto tulad ng dinisenyo at itinulak ang bawat solong order sa QuickBooks bilang sarili nitong transaksyon, at ang iyong file ngayon ay may 1,800 na resibo ng benta para sa nakaraang buwan lamang, na wala sa mga ito ang tumutugma sa anumang bagay sa iyong bank feed.
Parehong landas ay nagsisimula mula sa parehong makatuwirang paniniwala: "Kailangan ko lang hanapin ang tamang tutorial at maingat na ipasok ang lahat." Iyan ang kasinungalingan na nais nating itapon ng post na ito. Ang maingat na pagpasok ay hindi nag-aayos ng alinman sa mga problema, dahil ang alinman sa mga problema ay hindi isang error sa pagpasok.
Ang paraan ng pag-record ang nagpapasya ng lahat. Mayroong isang tiyak na istraktura — ang araw-araw na buod na journal entry, na dumadaloy sa isang clearing account patungo sa isang payout match — na ginagamit ng mga propesyonal na e-commerce accountant upang mag-record ng mga benta sa Shopify sa QuickBooks Online. Ito rin ang istraktura kung saan nakabatay ang bawat seryosong automation tool. Ang post na ito ay naglalakad sa eksaktong kung paano ito gumagana, na may halimbawang gumagana na maaari mong kopyahin.
Ang Dalawang Paraan ng Pag-record ng mga Benta sa Shopify na Karaniwang Nagkakamali
Bago ang pag-aayos, mahalagang maging tumpak tungkol sa mga mode ng pagkabigo, dahil mukha silang magkaiba ngunit nagbabahagi ng isang ugat na sanhi.
Mode ng pagkabigo isa: dobleng kita. Ang iyong bank feed ay kumukuha ng mga deposito ng payout ng Shopify — sabihin nating, $1,922 ang dumating noong Martes. Samantala, ang iyong sync app ay naitala na ang mga pinagbabatayan na order bilang mga resibo ng benta na may kabuuang humigit-kumulang $2,000. Kung ang deposito ay nakategorya bilang kita (na siyang default na ugali ng bank feed), ang QuickBooks ngayon ay nagpapakita ng humigit-kumulang $3,900 na kita mula sa $2,000 na benta. Paramihin sa bawat payout, bawat linggo, at ang iyong P&L ay tahimik na lumalaki hanggang sa panahon ng buwis, kung saan ito ay matatagpuan ng iyong CPA at sisingilin ka para sa arkeolohiya.
Paraan ng pagkabigo dalawa: ang transaction flood. Ang sync ay teknikal na tama — bawat order ay nagiging isang sales receipt na may mga line item, detalye ng customer, atbp. Sa 50 order kada buwan, okay lang ito. Sa 1,500 order kada buwan, ang iyong QuickBooks file ay nagiging isang warehouse ng mga indibidwal na transaksyon na nagpapabagal sa mga report, ginagawang bangungot ang pagtutugma, at maaaring magtulak sa iyo patungo sa mga limitasyon sa paggamit ng QBO. Mayroon kang perpektong detalye at zero na kalinawan.
Iba't ibang sintomas, parehong ugat na sanhi: parehong pamamaraan ang tinatrato ang mga order bilang yunit ng accounting. Hindi sila. Sa abot ng iyong mga libro, ang yunit na mahalaga ay ang araw — at ang perang talagang gumagalaw ay ang payout.
Bakit Nasira (at Patuloy na Nasira) ang Pag-sync ng mga Indibidwal na Order
Narito ang mekanismo, dahil kapag nakita mo na ito, ang solusyon ay nagiging halata.
Ang mga order ay gross. Ang mga payout ay net. Kapag ang isang customer ay nagbayad sa iyo ng $50, ang Shopify ay nagtatala ng $50 na order. Ngunit ang Shopify Payments ay nagbabawas ng kanilang processing fee bago pa man dumating sa iyo ang pera, pinagsasama-sama ang iyong mga transaksyon, hinahawakan ang mga ito ng ilang araw, at pagkatapos ay nagdedeposito ng isang malaking halaga. Ang deposito na pumapasok sa iyong bangko ay gross sales, minus refunds, minus fees, plus o minus adjustments — madalas na sumasaklaw sa mga bahagi ng mga order ng dalawang magkaibang araw. Sumulat kami ng isang kumpletong breakdown ng hindi pagtutugmang ito sa kung bakit ang iyong Shopify payout ay hindi kailanman tumutugma sa ipinapakita ng QuickBooks.
Kaya kapag nag-sync ka ng mga indibidwal na order, lumilikha ka ng mga income record na hindi kailanman direktang tutugma sa anumang bank deposit. Nakikita ng QuickBooks ang $2,000 ng mga sales receipt sa isang banda at isang $1,922 na deposito sa kabilang banda, at wala itong ideya na magkaugnay sila. Mayroon kang tatlong opsyon sa puntong iyon: ikategorya ang deposito bilang karagdagang kita (duplication), iwanan itong hindi natutugma magpakailanman (isang hindi ma-reconcile na bank account), o manu-manong subaybayan kung aling mga order ang kabilang sa aling payout, sa bawat oras (ang trabaho sa Linggo ng gabi na sinusubukan mong takasan).
Upang maging patas sa mga kasangkapan na kasangkot: ang opisyal na QuickBooks Connector ay tunay na mahusay sa kung para saan ito ginawa — mga tindahan na may mababang volume na nais ng detalye sa antas ng order at handang pamahalaan ang mga deposito nang manu-mano. Ang problema ay hindi na ito ay hindi maganda ang pagkakagawa. Ang problema ay ang pag-sync sa antas ng order ay ang maling pamamaraan kapag ang volume ay naging totoo.
Sinubukan mo ang tamang solusyon para sa problema ayon sa iyong pagkaunawa. Ang problema ay mas malaki lamang kaysa sa ipinakita ng mga tutorial.
Paano Mag-record ng mga Benta sa Shopify sa QuickBooks Online: Ang Paraan ng Araw-araw na Buod
Ang propesyonal na pamamaraan ay tinatawag na daily summary (maririnig mo rin ang "daily summarized journal entry" o ang "Shopify QuickBooks daily summary" approach). Ang ideya sa isang pangungusap: i-record ang aktibidad ng Shopify sa bawat araw bilang isang journal entry na naglalagay ng net amount sa isang clearing account, pagkatapos ay itugma ang aktwal na payout laban sa clearing account na iyon kapag ito ay pumasok sa bangko.
Isang araw ng benta, isang entry. Isang payout, isang tugma. Walang nabibilang ng dalawang beses, walang bumabaha sa file.
Narito kung paano ito buuin.
Hakbang 1 — I-set up ang limang account
Ang iyong chart of accounts ay nangangailangan ng limang partikular na account upang gumana ito. Gawin ang mga ito sa QuickBooks sa ilalim ng Settings → Chart of Accounts → New:
| Account | Uri | Kung ano ang nilalaman nito |
|---|---|---|
| Benta ng Shopify | Kita | Kabuuang benta ng produkto, bago ang anumang ibawas |
| Mga Refund & Return | Kita (contra) | Mga refund, itinala bilang negatibo laban sa mga benta |
| Paglilinis ng Shopify | Bank (o Iba Pang Kasalukuyang Asset) | Pera na nakolekta na ng Shopify ngunit hindi pa nababayaran |
| Mga Bayarin sa Shopify | Gastos | Mga bayarin sa pagproseso ng pagbabayad at transaksyon |
| Sales Tax na Babayaran | Iba Pang Kasalukuyang Pananagutan | Buwis na nakolekta mo at utang mo sa estado — hindi pera mo |
Ang clearing account ang pinakamadalas na hindi napapansin ng marami, at ito ang susi ng buong pamamaraan. Kinakatawan nito ang agwat sa pagitan ng "nagbayad ang customer" at "narating ng pera ang iyong banko." Kung gusto mo ng kumpletong istraktura ng account para sa isang e-commerce na negosyo — COGS, kita sa pagpapadala, mga clearing account na partikular sa gateway — sakop ito ng aming template ng chart of accounts para sa e-commerce.
Hakbang 2 — Kunin ang mga numero ng isang araw mula sa Shopify
Sa Shopify admin, pumunta sa Analytics → Reports → Finances summary, itakda ang saklaw ng petsa sa isang araw, at kunin ang limang numero: kabuuang benta, mga refund, nakolektang sales tax, at (mula sa Finances → Payouts, o ang export ng mga transaksyon) ang mga bayarin na sinisingil ng Shopify Payments sa mga transaksyon ng araw na iyon.
[LARAWAN: Ulat ng buod ng Shopify Finances na may saklaw ng petsa na isang araw, na may naka-highlight na kabuuang benta, mga refund, at mga buwis]
Hakbang 3 — Buuin ang journal entry (halimbawang gumagana)
Gamitin natin ang isang kathang-isip na araw na may mga bilog na numero. Noong Hunyo 3, ang iyong tindahan ay nagkaroon ng:
- Kabuuang benta: $2,000
- Mga refund na ibinigay: $150
- Sales tax na nakolekta: $130
- Mga bayarin sa Shopify Payments: $58
Sa QuickBooks: + New → Journal Entry, may petsang Hunyo 3. Ang journal entry ng benta ng Shopify sa QuickBooks ay ganito ang hitsura:
| Account | Debit | Credit |
|---|---|---|
| Paglilinis ng Shopify | $1,922 | |
| Mga Bayarin sa Shopify | $58 | |
| Mga Refund & Return | $150 | |
| Benta ng Shopify | $2,000 | |
| Sales Tax na Babayaran | $130 | |
| Mga Kabuuan | $2,130 | $2,130 |
[LARAWAN: Ang kumpletong journal entry sa QuickBooks Online, balanse ang mga debit at credit sa $2,130]
Basahin kung ano ang ginawa ng entry na ito. Ang iyong P&L ngayon ay nagpapakita ng $2,000 na benta, $150 na mga refund laban dito, at $58 na mga bayarin bilang gastos — tunay na kabuuang kita at tunay na mga gastos, hindi ang pinaghalong resulta na ibinibigay ng isang deposito. Ang $130 na buwis ay nasa isang liability account, dahil hindi ito naging pera mo. At $1,922 — eksakto kung ano ang utang sa iyo ng Shopify para sa araw na iyon — ay nakalagay sa clearing account, naghihintay.
Hakbang 4 — Itugma ang payout
Dalawang araw pagkatapos, isang payout ng Shopify na $1,922 ang lumalabas sa iyong bank feed. Sa halip na ikategorya ito bilang kita, ikategorya ito bilang transfer mula sa Shopify Clearing (o direktang itala ito laban sa clearing account).
Ang clearing account ay bumabalik sa zero. Ang deposito ay naipaliwanag. Walang nadoble ang pagbilang, at ang iyong bank account ay nagre-reconcile sa pinakamaliit na halaga.
Kung ang payout ay hindi nag-zero out sa clearing account, hindi iyon depekto sa pamamaraan — iyon ang paggana ng pamamaraan. Ang natitirang balanse ay nangangahulugang nagbago ang isang bayarin, tumawid ang isang refund sa hangganan ng payout, o nagkaroon ng pagsasaayos, at eksaktong sinabi sa iyo ng clearing account kung magkano ang hahanapin. Ang pagtutugma ng payout sa malaking sukat ay isang disiplina sa sarili nito; sakop natin ito mula simula hanggang dulo sa paano i-reconcile ang mga payout ng Shopify sa QuickBooks.
Hakbang 5 — Ulitin araw-araw, i-verify buwan-buwan
Isang entry bawat araw, isang match bawat payout. Sa katapusan ng buwan, dalawang tseke: ang balanse ng clearing account ay dapat katumbas ng anumang hindi pa nababayaran ng Shopify (ihambing sa mga nakabinbing payout sa Shopify admin), at ang Sales Tax Payable ay dapat tumugma sa iyong mga ulat sa buwis ng Shopify bago ka mag-file.
Iyon ang buong paraan. Humigit-kumulang 30 mga hilera bawat buwan sa halip na libu-libong mga transaksyon — at bawat hilera ay maaaring masubaybayan sa isang ulat na ibinigay sa iyo ng Shopify.
Dapat Mo Bang Gawin Ito Nang Manu-mano o I-automate Ito?
Tapat na sagot: halos ganap itong nakasalalay sa dami ng order, at ang threshold ay mas mababa kaysa sa inaakala ng karamihan.
Mas mababa sa ~100 order bawat buwan, ang manu-manong pang-araw-araw na buod ay talagang magagawa. Maaari mo pa itong ipagsama-sama linggu-linggo. Asahan ang 15–20 minuto bawat araw, o isang oras o higit pa bawat linggo. Kung ikaw iyon, lahat ng nasa itaas ay sapat na para sa iyo — i-bookmark ang post na ito at umalis ka na.
Sa pagitan ng 100 at 500 order bawat buwan, gumagana pa rin ang paraan, ngunit nagsisimulang magkaproblema. Ang mga refund na dumarating sa ibang araw kaysa sa kanilang orihinal na mga order, ang mga payout na sumasaklaw sa dalawang araw ng mga transaksyon, ang paminsan-minsang hindi pagkakaunawaan o pagsasaayos — bawat isa ay isang maliit na proyekto ng pananaliksik. Ang bookkeeping ay hindi na mahirap, ngunit ito ay walang tigil, at ang isang linggong paglaktaw ay lumilikha ng backlog na masakit na ayusin.
Higit sa 500 order bawat buwan, ang manu-manong pang-araw-araw na buod ay nagiging isang part-time na trabaho na may deadline sa pagsunod. Ito ang dami kung saan halos lahat ay ipinapasa ito sa isang bookkeeper (na maniningil para sa mga oras na iyon buwan-buwan, magpakailanman) o ina-automate ang paglikha ng entry. Walang maling pagpipilian — ngunit ang "Maging disiplinado na lang ako tungkol dito" ay hindi na isang totoong plano dito.
Isa pang bagay, dahil ang binary sa itaas ay bahagyang mali: sa pagitan ng "mag-type ng mga journal entry nang manu-mano" at "buong auto-sync" ay may gitnang antas — manu-mano ngunit tinutulungan. Ang pahina ng Manual Sync ng LedgerPort ay naglilista ng bawat order na hindi pa na-sync, na may petsa-saklaw, katayuan, at mga filter ng paghahanap. Piliin ang mga order na gusto mo (o Piliin Lahat), i-click ang Sync Selected, at ang bawat isa ay ipo-post sa QuickBooks bilang isang tamang naka-istrukturang transaksyon, na may bawat order na Synced o Error na resulta upang walang mabibigo nang tahimik. Walang data entry — ngunit ikaw ang magbibigay ng utos.
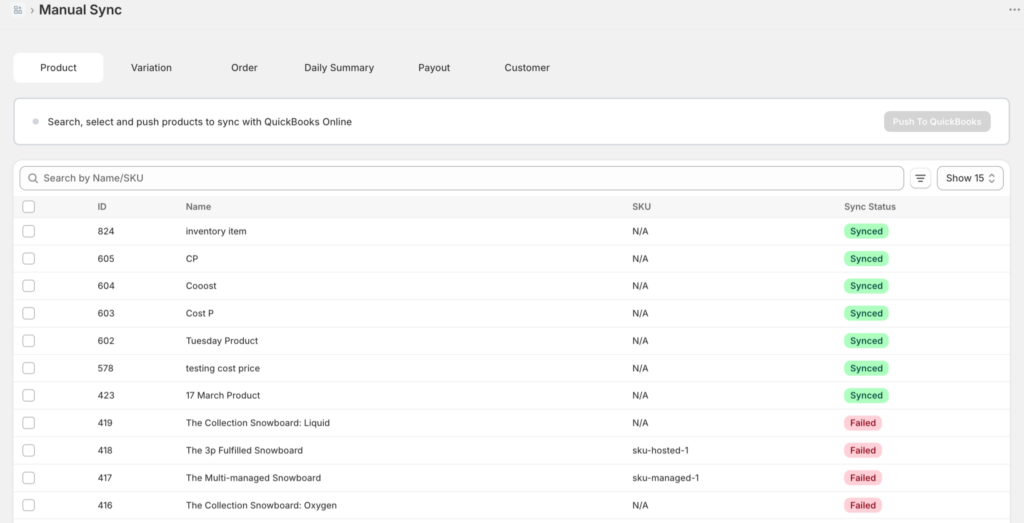
Iyon mismo kung paano gumagana ang libreng tier — lahat ng pag-sync ay manu-mano, nang walang mga paghihigpit — na ginagawa itong isang zero-cost na paraan upang panoorin ang paraan na gumana laban sa iyong totoong mga order bago mo ito pagkatiwalaan sa autopilot. Ang auto-sync, na tumatakbo kada oras sa mga bayad na tier, ay ang pag-upgrade na gagawin mo pagkatapos mong makita ang iyong sariling Hunyo 3 na mapunta sa tamang mga account.
Pansinin kung ano ang binabago ng automation at kung ano ang hindi nito binabago. Ang paraan ay nananatiling magkapareho — pang-araw-araw na buod, clearing account, payout match. Ang automation ay lumilikha lamang ng mga entry para sa iyo, araw-araw, nang hindi hinihingi.
Ano ang Ginagawa ng LedgerPort Gamit ang Estrukturang Ito
Ang LedgerPort ay isang halimbawa ng automation na iyon, at sulit na maging tiyak tungkol sa kung ano talaga ang ginagawa nito, dahil ito ay tumutugma sa bawat hakbang sa mga hakbang na iyong nabasa.
Ini menghubungkan toko Shopify Anda (WooCommerce juga) ke QuickBooks Online dan membuat entri jurnal ringkasan harian secara otomatis — penjualan kotor, pengembalian dana, dan pajak penjualan, masing-masing disalurkan ke akun yang tepat. Ini memisahkan biaya Shopify ke baris pengeluaran tersendiri alih-alih membiarkannya hilang di dalam setoran bersih. Dan ini menangani pencocokan pembayaran: ketika pembayaran masuk, itu dikaitkan kembali ke akun kliring sehingga umpan bank Anda direkonsiliasi alih-alih duplikat.
Ringkasan harian bukanlah solusi sementara yang ditambahkan ke alat per pesanan. Ini adalah salah satu dari lima metode sinkronisasi pesanan yang didukung LedgerPort — Kuitansi Penjualan, Faktur, Perkiraan, Ringkasan Harian, dan Berbasis Tag — dipilih sekali di tab Pesanan dari konfigurasi sinkronisasi dan diterapkan pada setiap sinkronisasi setelah itu.
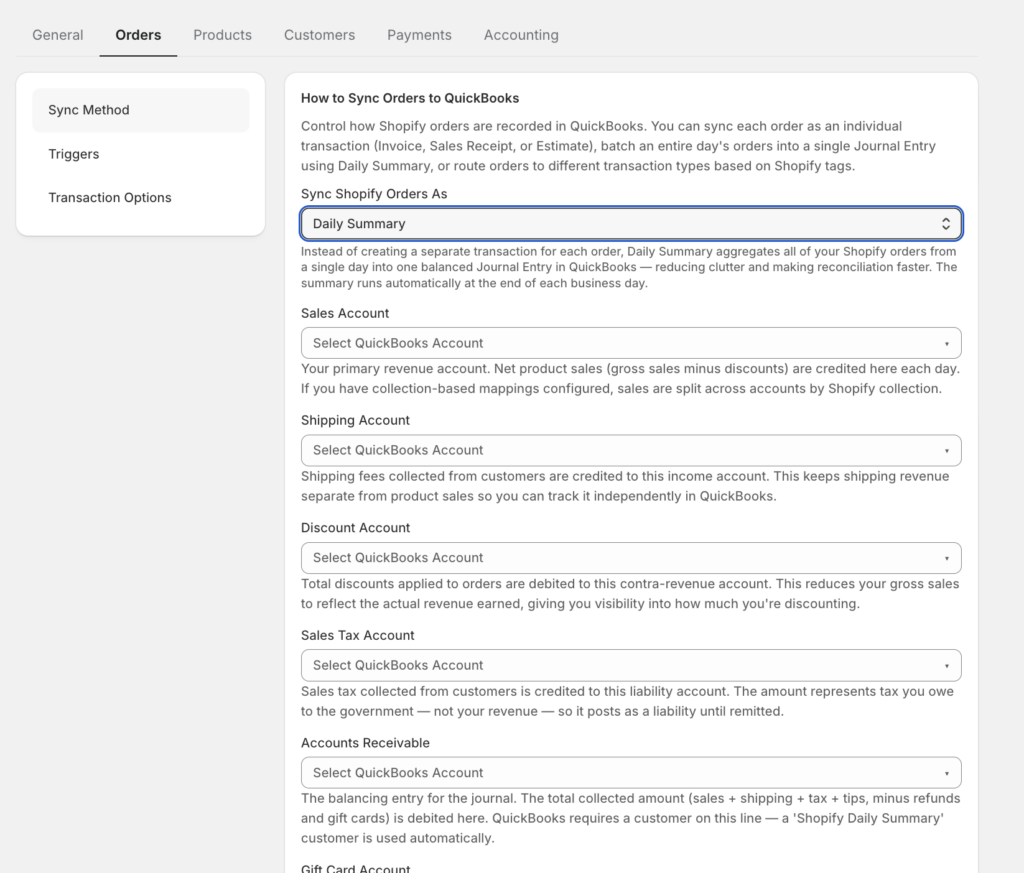
Dengan kata lain: contoh Juni 3 di atas, dilakukan untuk setiap hari, tanpa Anda membuka laporan Keuangan.
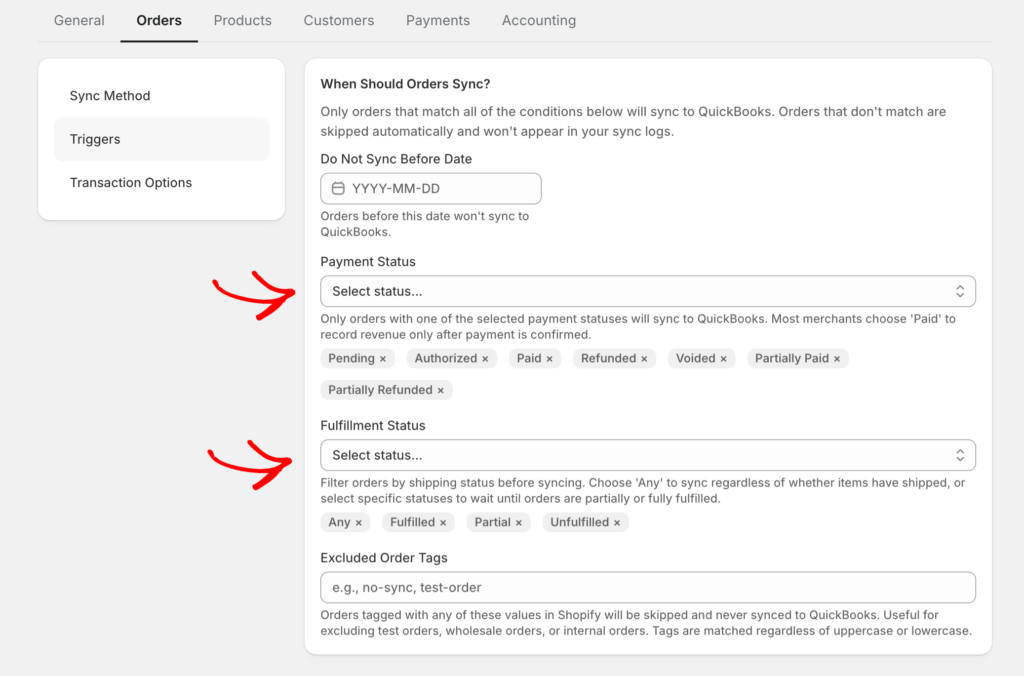
Ada bagian yang lebih halus dari metode manual yang harus disempurnakan oleh otomatisasi: kapan penjualan dihitung. Langkah 2 memberi tahu Anda untuk menarik pesanan yang dibayar saja — keputusan pengakuan pendapatan yang tersembunyi di dalam filter laporan. LedgerPort menyandikan disiplin yang sama sebagai pemicu sinkronisasi, diatur di Konfigurasi Sinkronisasi » Pesanan: pesanan diposting ke QuickBooks hanya ketika memenuhi kedua kondisi status pembayaran dan kondisi status pemenuhan. Pengaturan yang direkomendasikan untuk sebagian besar toko adalah Dibayar ditambah (Belum Terpenuhi dan Terpenuhi) — pendapatan masuk ke QuickBooks saat uang benar-benar bergerak, terlepas dari status pengiriman. Pesanan yang tertunda dan diotorisasi tetapi tidak pernah ditangkap tidak diposting, dan pesanan yang dibatalkan dikecualikan secara default, sehingga pembatalan tidak pernah muncul sebagai pendapatan.
Satu prasyarat berada di antara "lima akun" dan "tanpa campur tangan", dan patut disebutkan: pemetaan produk. Setiap produk Shopify menunjuk ke item QuickBooks, yang merupakan cara pendapatan disalurkan ke akun pendapatan yang tepat — dan itu berlaku untuk semua metode sinkronisasi, termasuk Ringkasan Harian, tidak hanya sinkronisasi per pesanan. Ini adalah satu kali lintasan, bukan proyek: Auto-Map mencocokkan katalog Anda dengan item QBO berdasarkan SKU atau nama produk dalam satu klik, dan apa pun yang tidak dapat dicocokkan tetap ditandai secara terlihat sebagai Belum Dipetakan untuk pembersihan manual alih-alih diposting secara diam-diam di tempat yang salah. Bersama-sama, itulah keseluruhan cerita konfigurasi: pemicu memutuskan kapan penjualan dihitung, pemetaan memutuskan di mana itu diposting — dan keduanya diatur sekali.
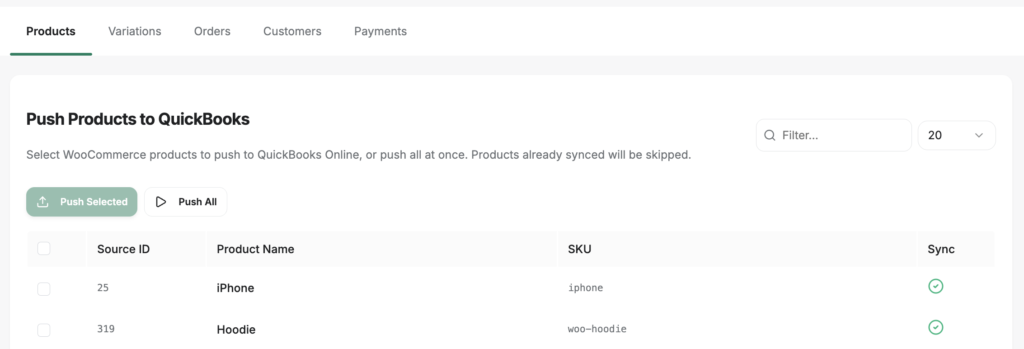
At ang mga buwan na naitala mo na ang mali? Hindi mo na kailangang ipasok muli ang mga ito. Ang Manual Sync page ng LedgerPort ay nagtutulak ng historical data sa QuickBooks kapag kailangan — piliin ang mga record na iyong binabago (o itulak lahat), at isang progress modal ang magpapakita ng bawat isa na dumarating. Bawat row ay may sync status, at anumang naka-marka na bilang synced ay awtomatikong nilalaktawan, kaya ang muling pagtulak pagkatapos mong ayusin ang isang mapping ay hindi lilikha ng mga duplicate.
Praktikal na mga detalye, tapat na sinabi. Ang pag-setup ay tumatagal ng mga 15 minuto — ikonekta ang store, ikonekta ang QuickBooks, kumpirmahin ang account mapping. Mayroong libreng plano (hanggang 30 orders kada buwan, isang store, manual sync on demand), na sapat na para panoorin ang paraan na tumatakbo sa iyong totoong data. Ang Growth plan ay nagsisimula sa $25/buwan para sa hanggang 1,000 orders na may araw-araw na automated sync; ang mga journal ng payout at kumpletong paghawak ng bayarin ay kasama sa Scale plan mula sa $67/buwan, na sumasaklaw sa hanggang 5,000 orders at tatlong store na may real-time sync. Ang mga detalye ay nasa pricing page, at bawat bayad na plano ay may 14-araw na money-back guarantee — 100% refund, walang tanong na itatanong.
Isang tapat na trade-off: kung gusto mo ng order-level na detalye sa loob ng QuickBooks — bawat pangalan ng customer, bawat line item — ang isang summary-based na tool ay sadyang hindi iyon. Ang mga summary tool ay umiiral dahil, para sa mga libro sa dami, ang detalye ay nabibilang sa Shopify at ang accounting ay nabibilang sa QuickBooks.
Kapag Ang Pag-record ng mga Benta ay Hindi Na Isang Gawain
Narito ang bersyon ng kuwentong ito na nagtatapos nang maayos.
Ito ang ikatlo ng buwan. Ang iyong P&L ay nagpapakita ng eksaktong ibinenta mo noong Hunyo — gross sales sa itaas, refunds at fees na nakikita bilang sarili nilang mga linya, buwis na nakalagay sa isang liability account kung saan ito nararapat. Bawat payout sa iyong bank feed ay tumutugma. Ang clearing account ay nagbabasa ng zero. Ang iyong CPA ay nagpapadala ng isang-linya na email: "Malinis ang mga libro. Walang kailangan mula sa iyo."
At ang pinaka-kakaibang bahagi ay ang hindi mo ginawa. Hindi ka nag-enter ng kahit ano nang maingat. Hindi ka nakahanap ng mas magandang tutorial. Itinigil mo ang pag-record ng mga benta tulad ng pagtigil mo sa pagpansin sa isang pinto na hindi na tumutunog — ang istraktura ay tama, kaya ang gawain ay tahimik na nawala.
Ang $2,130 journal entry mula Hunyo 3 ang buong sikreto. Maaari mo itong buuin nang mano-mano bawat umaga, o maaari mo itong buuin para sa iyo habang ikaw ay natutulog. Magsimulang libre sa LedgerPort — lumilikha ito ng eksaktong entry na iyon mula sa iyong totoong data ng store, at ang una ay tumatagal ng mga 15 minuto para makita →